


Making pictures of chemistry experiments
Making good pictures of chemistry experiments, such as test tubes with colorful liquids, colorful gases and nice crystals is an art on its own, which is not really difficult, but one has to adhere to a few basic rules to get good results. Practicing a lot helps to make good pictures.
Often, objects to be photographed in chemistry, are quite small, and in many cases they are transparent and/or shiny or sparkling. These conditions allow one to make very interesting pictures, but bad focus, a messy background and inappropriate lighting conditions can make chemistry-related pictures rather dull and boring. Large perspective distortion is another issue, which can make pictures unpleasant. In this page some guidelines are given for making good pictures.
![]()
Some very easy changes can make a big difference
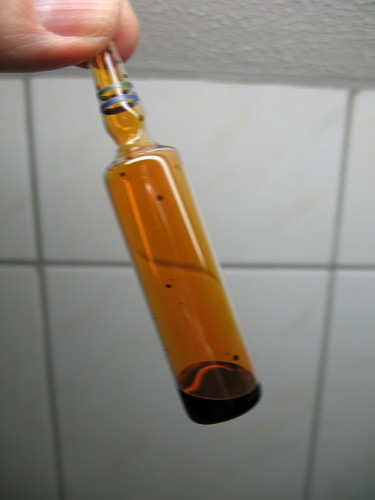
Before the more technical aspects of photography are addressed, a very simple and easy rule is presented here. Choose a good background for your subject! Many many pictures are spoiled, simply because of the mess at the background. The following two pictures clearly demonstrate how a suitably chosen background can make a picture more attractive and more accurate in terms of color reproduction:
For both pictures the same sample of bromine was photographed. Both pictures have similar lighting conditions and both are well-focused, but the left picture is much more attractive than the right picture.
This is rule #1: Choose a suitable background for your subject!
If you want to make a website about chemistry with pictures of experiments, then you must arrange for something in which you can make pictures with suitable background. This does not need to be expensive. A big sheet of white paper with a grid drawn on it already can make a big difference.
Another thing, observed on many websites about chemistry is motion blur due to low light conditions, often encountered in chemistry labs. Even professional labs sometimes provide pictures with motion blur. Compare the two following pictures:
In the right picture, the camera was shaken while the button was pressed, resulting in a blurred image. This blurred image is not attractive at all. Motion blur and out-of-focus imaging are killing for image quality.
This is rule #1 as well: Always have well-focused sharp images! Discard blurred images, they are NOT suitable for publishing on a website!
After having this said, it is time to go somewhat deeper and introduce some techniques which can be used to further improve the quality of pictures. But if rules #1 and #1 are not followed, then all other attempts at improving image quality are in vain.
![]()
Lighting conditions
A very important aspect of making pictures is to have good lighting conditions. In ordinary photography this is very important and things are not different at all in photography for chemistry-related subjects. With computer software one can improve pictures somewhat, but a bad picture never can be transformed into a good one.
A general rule of thumb is that light from behind results in 'flat' somewhat dull images. Color reproduction usually is best in such conditions, but the resulting images lack the sparkle and liveliness which make a nice picture into a really good picture. Light behind the subject can result in very nice pictures, but in many cases, the light also introduces problems, such as overexposure of background, or excessively dark shadowing/silhouetting of the subject.
Setup for lighting
The picture below shows the setup, used for the great majority of the pictures in this website. A light source is used under a wooden shelf, which is used for illuminating all subjects. The light source should be a light source which emits white light. Best results are obtained with bar-shaped FL-tubes which emit high frequency (appr. 15 kHz) white light. A 50 Hz source can also be used, but this may introduce flickering, which makes taking good pictures with short exposure times more difficult. If a 50 Hz light source is used, then one with a very slow phosphor should be applied. A simple tungsten incandescent light bulb is not really suitable. The light from these is way too yellow and you need strong color filters (either in the camera, or in computer software) to get rid of the strong yellow/orange hue when pictures are made with such a light source. Modern digital cameras have automatic white balance capabilities, but the best results are obtained if the light is white itself and only minor adjustment is needed by the camera's internal filtering software.
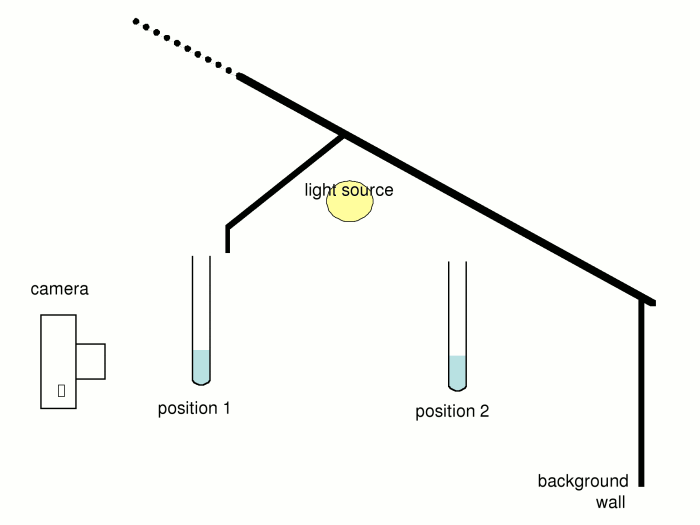
Influence of position
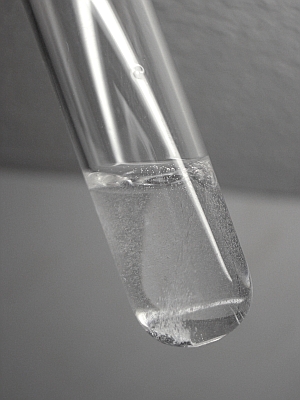
Objects can be put anywhere between position 1 and position 2. The choice of position is important. A transparent and clear liquid can best be photographed in position 1. In this situation, the light still mainly is coming from the front and this adds sparkle to the picture which makes it more interesting.
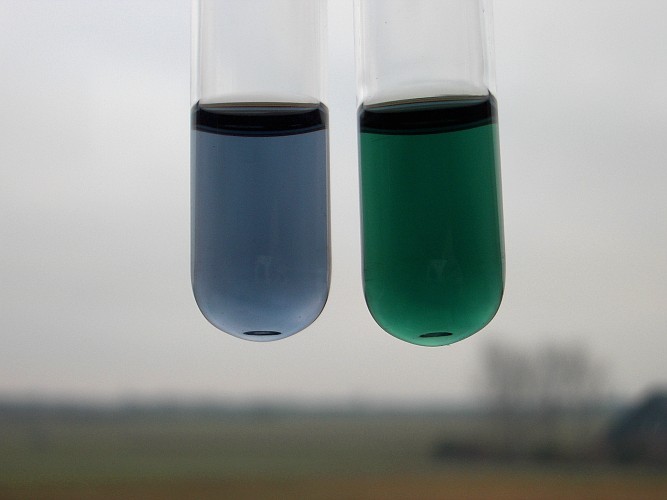
The following two pictures are pictures of a tube of a solution of copper sulfate. The left picture is taken with the test tube at position 1, the right picture is taken with the test tube at position 2.

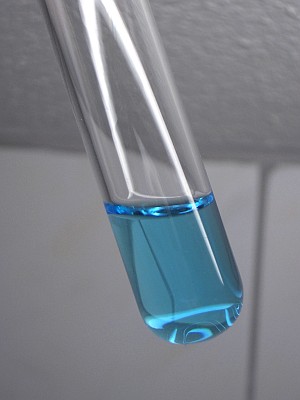
The color reproduction of the right picture is somewhat better, but the rims of the test tube are not as contrasting as in the left picture. In this case, it is a matter of taste which picture is best, but the left picture is somewhat more dynamic. The left picture also suffers less from the reflection of light on the test tube.
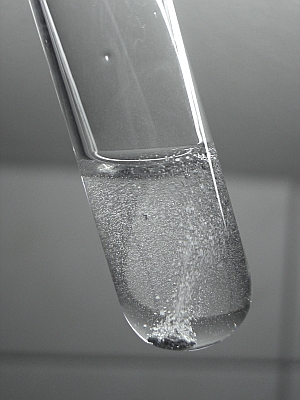
The difference becomes much more dramatic when the liquid contains bubbles of gas. In that case, making a picture at position 1 results in a beautiful sparkling image, while making a picture at position 2 results in a dull picture. Below, two pictures of bubbles of hydrogen are shown, made by adding small pieces of zinc to dilute hydrochloric acid. The liquid is colorless. Both pictures are equally sharp and have exactly the same lighting conditions and image post-processing to make them suitable for a webpage. The difference is really stunning.
Making pictures of opaque objects and turbid liquids
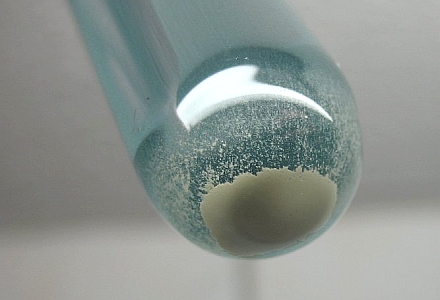
When a liquid is opaque, or turbid, due to the presence of a precipitate, then the subject must be in position 2 for a good picture. A subject in position 1 will have way too dark shadows and the resulting image is a dark silhouette of the subject and color reproduction is bad. Pictures of precipitates for this reason never are as sparkling and brilliant as pictures of clear liquids or pictures of gas bubbles in clear liquids.
With this kind of pictures it is of utmost importance to have the pictures really sharp. Even a fine precipitate shows structure when viewed in detail and when this detail is visible in the picture, then the resulting image is much more attractive, than when just the color is visible.

Both pictures seem to look sharp and well-focused and both pictures nicely show the color of the precipitate of lead iodide, yet the right picture is much better than the left picture. When transparence and sparkle are missing, then detailed structure makes a picture more interesting and appealing.
Making interesting pictures of precipitates sometimes is really hard, simply because the precipitate shows no interesting details at all, or because the liquid above the precipitate has a certain color.

In such cases, taking pictures from a somewhat unconventional point of view may reveal interesting details and can result in more pleasing pictures. The left picture is a conventional view of the precipitate, the right picture is a strong close-up view of the precipitate at the bottom of a test tube.
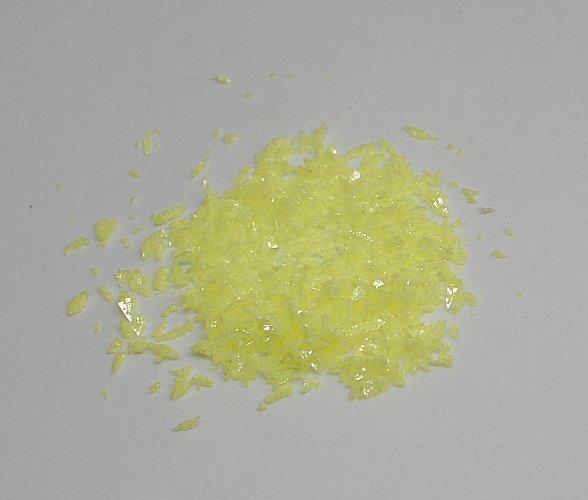
Photographs of crystalline solids
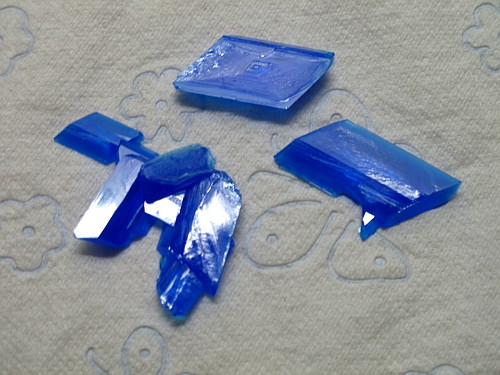
Crystalline solids can add a dimension to pictures, which is not offered by most other solids. With the right lighting conditions, one can obtain pictures with nice sparkles, due to glittering of the crystals. The picture of crystals of sulphur nicely shows the effect of glittering. In this case, best effects are obtained when the subject is halfway between position 1 and position 2 with the light source from above and the camera halfway between the light source and the subject. One just has to be sure that direct light from the light source hits the subject, otherwise the picture becomes dull.
Making pictures of crystals in direct sunlight is not advisable. The contrast between the bright reflections of light and the shadows becomes so high, that either the shadows become black, or the reflections of light become overexposed and no details are available anymore in the reflections.
![]()
Effect of in-camera or near-camera flash light
It is very tempting to use the flash light of a camera, when the lighting conditions are not good, as usually is the case in a chemistry lab without special provisions for photography. Although the flash light can be useful in some situations, it frequently results in dull and flat images. The flash unit usually is on the camera or near the camera and this implies that the light always is as if the light source is behind the camera.
A picture was made of a set of crystals of copper sulfate. The first picture was made using a light source from above (the copper sulfate halfway between position 1 and position 2, as explained in the drawing above). A second picture was made with both the camera and the crystals at the same position, but now using a flash light.
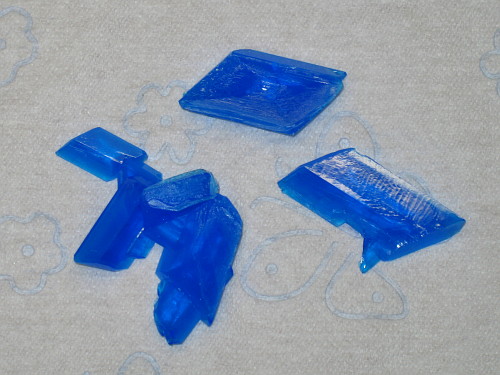
The first picture is without flash light, the second is with flash light. The use of flash light makes the color reproduction somewhat better, but the picture looses all of its sense of depth. The structure of the tissue is lost, the shadows are lacking, and the crystals look rather dull. The upper picture nicely demonstrates that the crystals are shiny and this effect is largely lost in the second picture.
Of course, when external flash units are used, which are triggered by a slave-unit, then what is told here does not necessarily hold. A flash-unit, triggered by a slave-unit can be placed anywhere, allowing lighting arrangements which are like the one sketched in the drawing above (the light source replaced by a flash unit).
![]()
Background of images
Another important factor, which determines success is the choice of background for pictures. When one is making pictures of transparent objects or liquids, then it is best to choose a background with some details, such as a tiled wall. It is important though that the main color of the wall is white, otherwise the color reproduction will be bad.

The picture at the right has a uniform white background and although the color of the solution is rendered quite well, the picture does not look very pleasing. It is rather dull, when compared to the picture at the left. It even is hard to tell whether the liquid is turbid or not in the right picture. The tiling in the left picture also leads to patterns in the blue liquid and these patterns immediately reveal that the liquid is clear.
The effect is even stronger when liquids with bubbles of gas are photographed. In the right picture one hardly can see the bubbles of gas. All sparkle and brilliance is lost.
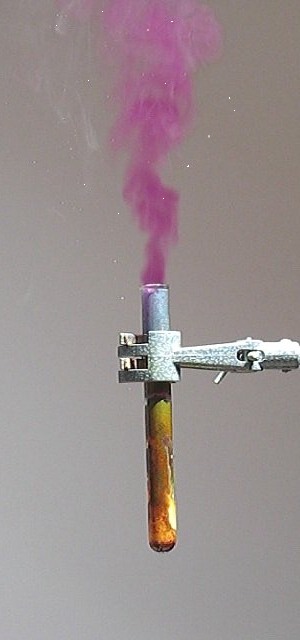
Usually a synthetic background in the form of a tiled wall, or a pig piece of white paper with a line pattern drawn on it gives best results, but sometimes it also is nice to have a natural background. The picture below is made outside on a cloudy winter day with a meadow and a farmer's house in the background. If outside pictures are made, then one must be sure that the colors of vegetation and sky do not interfere with the colors of the liquids. Blue sky and green vegetation are not suitable as background for transparent liquids, but for opaque subjects they can be useful for creating interesting contrasts. One also must assure that the background is out of focus. This assures that all emphasis is put on the subject instead of the background.
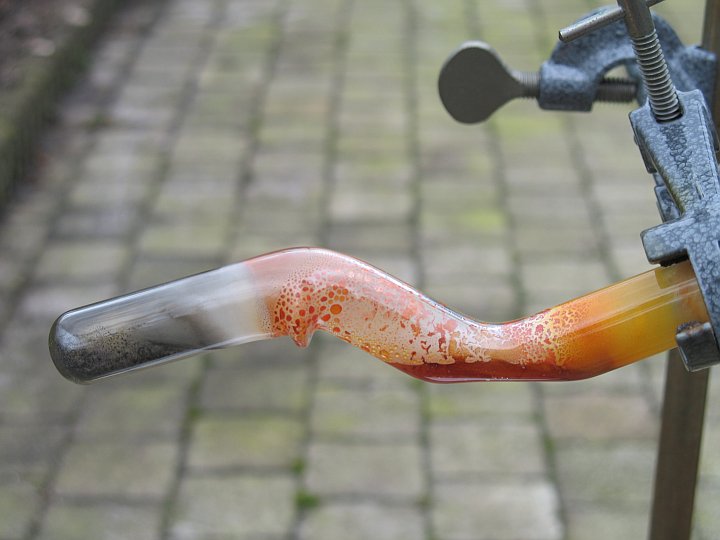
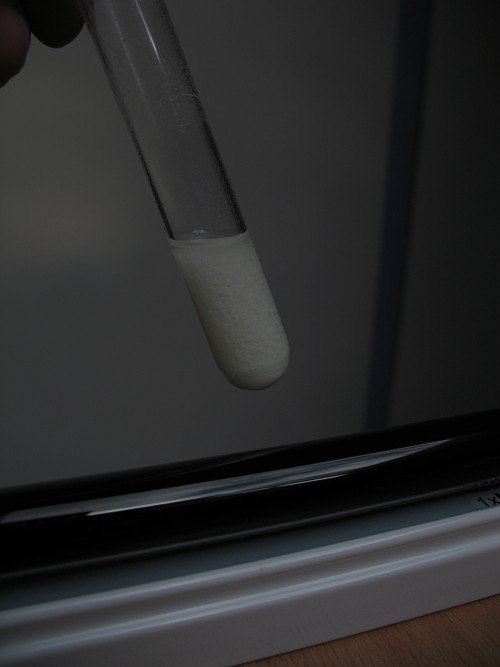
Sometimes it is not safe or even impossible to make pictures inside (such as when very toxic chemicals are produced, or dangerous procedures are carried out) and then it is important to choose such a camera position that the background is as neutral as possible and out of focus. An example of such a picture is the one shown below (making white phosphorus from red phosphorus by strongly heating the red phosphorus). Again, the subject is well in focus and the background is soft. Besides that, there is a strong color contrast for the red part of the test tube.
![]()
Macro photography: depth of field and fish eye effect
Many pictures require the use of macro techniques in order to get pictures of the subject which are sufficiently large. Many cameras have a strong macro setting, which allows one to make pictures of very small objects, while maintaining full image coverage. One has to keep in mind though, that these (super)macro settings almost always are geared towards photography of flat 2D subjects like stamps and coins. For 3D subjects, these strong macro settings are next to useless. The drawing below shows two cameras, both having a macro setting.
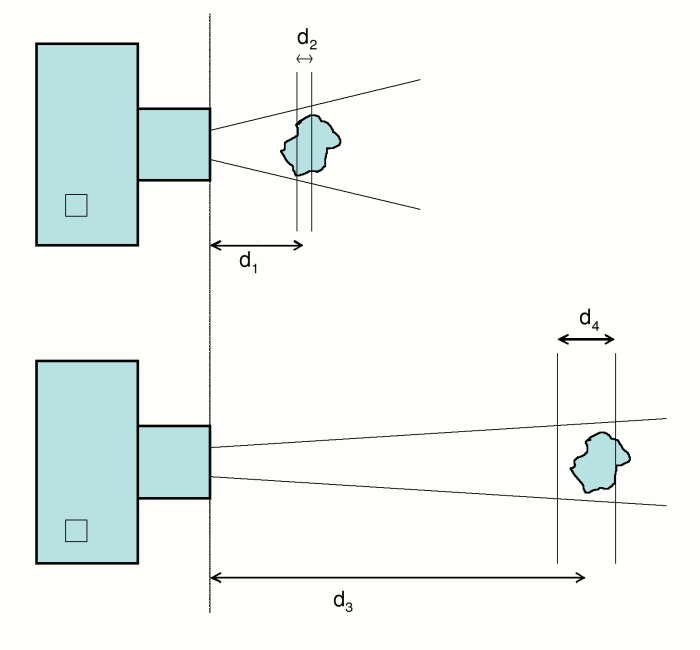
The camera at the top requires you to bring the lens close to the subject. The lines from the lens show how much the image is covered with the picture of the subject. One can obtain good coverage of the total image area. The bottom camera allows the subject to remain further away from the lens. The image coverage is approximately the same.
Depth of field
So, superficially speaking, there hardly seems to be a difference between the two cameras, but there actually is a big difference. When a picture is taken from a subject, then one usually wants the entire subject to be well-focused in the image.
Suppose the upper camera can focus well at distances not less than d1 and it has a viewing angle as drawn in the picture. Suppose the lower camera can focus well at distances not less than d3 and it has a much narrower viewing angle, as shown in the picture. Both cameras then achieve the same image coverage for the same subject.
Another important property for a camera is the achievable depth of field for a given focusing distance. This is the area in which the subject of the image appears acceptably sharp. For the upper camera the depth of field equals d2 and for the lower camera the depth of field equals d4.
Usually, the achievable depth of field is strongly related to the focusing distance and one can roughly assume that for most decent modern cameras the ratio of focusing distance and achievable depth of field is the same. So, d1/d2 is roughly the same as d3/d4. One now immediately sees that for an object of a given size, one usually has larger depth of field if the object can be moved further away from the camera lens.
With the upper camera it will be impossible to make a picture of the object which is both sharp at the front side of the object and the back side of the visible part of the object. With the lower camera one has a depth of field which allows the entire visible part of the object to be photographed in a well-focused way. The real back part of the object, which is not visible of course needs not be in the sharp area.
With test tubes and also with samples of crystals, elements, small vials, and so on, one usually needs a depth of field of approximately 1 cm and when one needs to have the subject to be 1 cm in front of the lens for good image coverage, then one can expect to have a depth of field of the order of magnitude of 1 mm and then one cannot make a nice well-focused picture of such an object. The real physical background behind this story is that most modern cameras have their (super)macro setting at a wide angle setting, they are like the upper camera in the drawing. Some cameras have their (super)macro setting at a tele angle setting and such cameras are much more suitable for chemistry-related photography, they are more like the bottom camera.
Depth of field and aperture size
A well known way of improving depth of field is decreasing the aperture size of the diaphragm of the camera lens. In most digital cameras this can be set manually, but not all cameras allow the aperture size to be set when operating in macro mode.
Selecting a smaller aperture size, however, comes at a cost. If one halves the aperture size (in photography terms: 1 stop) then one needs to double the exposure time for the same image lighting. Do not be tempted to select a higher ISO setting on the digital camera, because that introduces more image noise. Keep the ISO setting 100 or lower and if necessary, use a tripod to obtain sharp images. Having motion blur is as bad as having unfocused images due to low depth of field.
One also should not blindly select the smallest possible aperture size for another reason. At very low aperture sizes (high f-numbers, e.g. f/16, f/22) there is the problem of diffraction. Light grazing the edge of an obstacle tends to veer off-course somewhat. This is due to the wave-like nature of light. With modern digital cameras having CCD sensors of several megapixels the spreading of light due to diffraction may be across several pixels. If this happens, then the diffraction puts a limit on the achievable sharpness of the picture. There may be a trade-off between depth of field and diffraction limiting. For many compact digital cameras, diffraction limiting may occur at f/11 or even f/8. If the depth of field is really shallow, then one might accept some diffraction limiting getting a better depth of field in return. In practice one then exchanges overall image sharpness for better depth of field.
A good description about the physical background of this effect can be found here: http://www.cambridgeincolour.com/tutorials/diffraction-photography.htm.
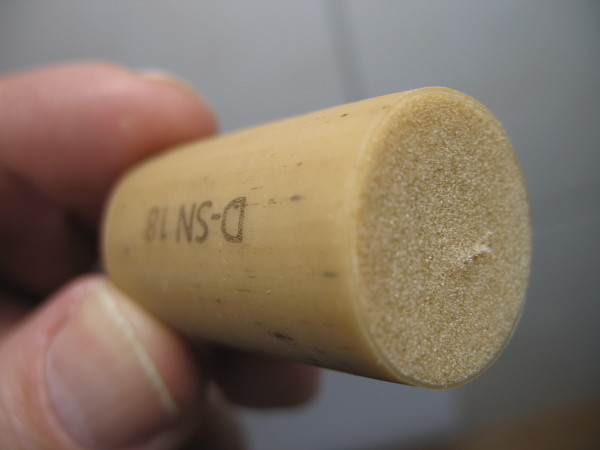
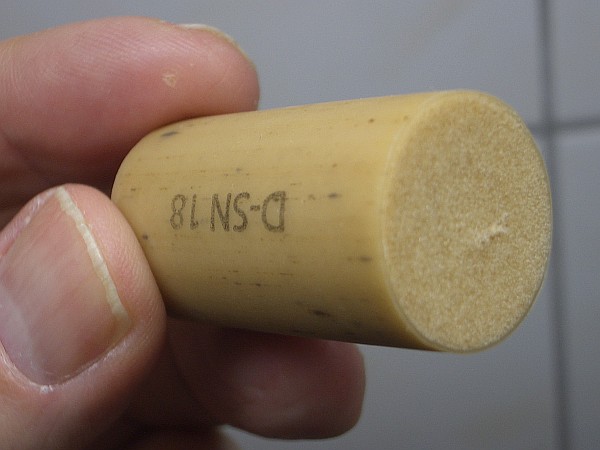
Fish eye effect
Another effect, which is hard to draw in a diagram, but which best is demonstrated with a real picture is the so-called fish eye effect.
The closer the focusing distance (and the wider the angle) the more perspective distortion one obtains. This perspective distortion is really excessive when the object size is of the same order of magnitude as the focusing distance as shown by the picture above. This effect may be nice when making funny pictures of animals, but when making chemistry-related pictures it is highly undesirable.
A picture of a cylindrical object nicely demonstrates this perspective distortion. The cylindrical object is an artificial "cork" from a wine bottle.
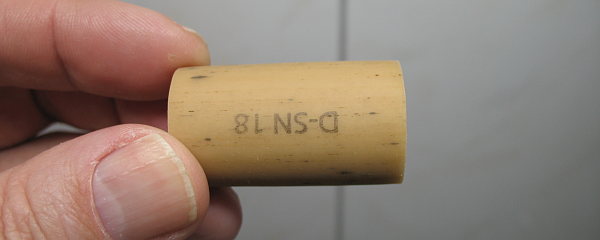
This "cork" is photographed with two cameras with different focusing distances. The upper picture is made with a camera having a short focusing distance and having a wide angle. The lower picture is made with a camera having a larger focusing distance and having a correspondingly narrower angle. The lower picture is much more pleasing than the upper picture. The pictures at the same time also show the effect of larger depth of field for the lower picture.
Improving existing camera
When you have a camera and its macro setting indeed requires the object to be very close to the lens, then its macro properties can be improved by placing a positive lens in front of the camera, close to the lens of the camera. This reduces the angle and allows objects to be focused at a larger distance for the same image coverage. The principle behind this is shown by the picture below.

The dashed lines show the angle of the camera, and the solid lines show the effect of the lens placed between camera and subject. Without the lens the subject must be placed at the position, shown by the grayed out object in order to obtain the same image coverage. The use of the lens hence makes the image better from a perspective point of view. It, however, does not improve the achievable depth of field. The achievable depth of field is a camera property and this cannot be changed with an additional simple lens.
This trick for improving an existing camera works nicely for all cameras, but the lens must be a high quality lens. A lens with an optical power of +2 dioptres is suitable for all cameras. A lens, suitable for this trick is the DMW-LC55, which can be purchased in well-equipped photography stores and on eBay. Raynox is a company, which also makes close-up lenses.
It also is very important that the lens is perfectly aligned with the camera's lens. The center of the lens must be precisely in front of the center of the camera's lens. If the lens and camera are not properly aligned, then the image will be distorted.
![]()
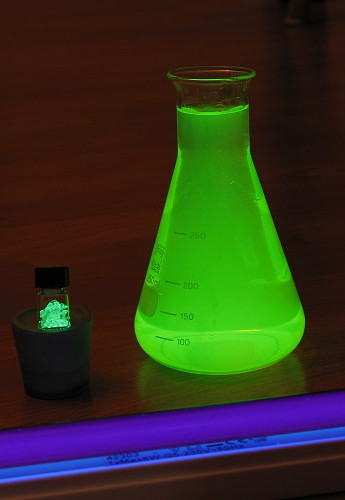
Dealing with high contrast
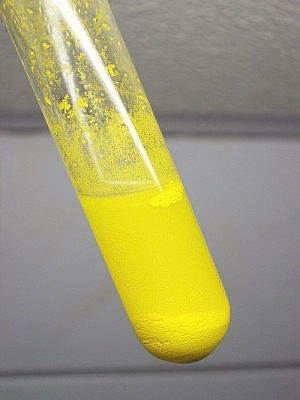
The human eye is amazingly good at dealing with high contrast in the same scene. Dark objects still are viewed in good detail and bright objects can be observed correctly as well, including their color. When a picture is made of such situations, then the result usually is rather disappointing. Below, a picture is shown of a test tube, filled with a brightly fluorescent solid (copper(I) pyridine iodide complex) in a moderately lit room, with a blacklight in the foreground, which is responsible for the fluorescence. The color of the fluorescence is bright yellow.
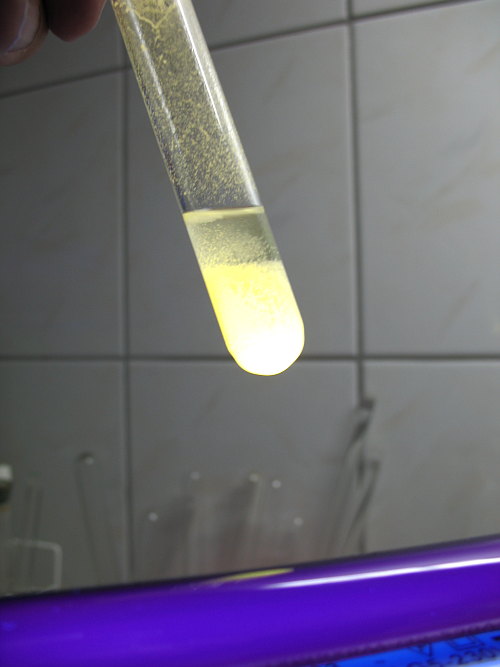
The camera determines its lighting settings from the average light input from this scene. The solid in the test tube emits most light, but the camera uses the average of the light input. It selects an exposure time, such that the average of the picture looks fairly well, but the final result is very disappointing. The yellow light of the fluorescence looks white and highly overexposed. All detail is lost.
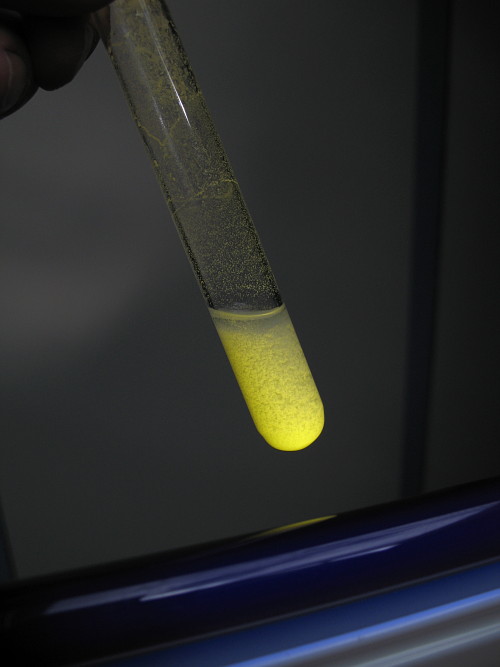
A much better result is obtained if the camera is adjusted, such that it takes a two stops underexposure when it determines the exposure time. The overall image then becomes much darker, but the yellow fluorescence is captured very well and the image also beautifully demonstrates the large contrast between background light and the light of the fluorescence.
The same camera settings were used for making a picture of this scene, but with the blacklight switched off. The background in this picture is somewhat lighter and this is because the camera now does not receive the bright light of the fluorescent solid and hence perceives a somewhat lower average light input. It corrects for this, by increasing the exposure time somewhat (in this particular case it increased exposure time from 1/125 seconds to 1/80 seconds).
In general one can state that if a small but bright object has to be captured in a picture, then one needs to adjust exposure, such that the overall image becomes darker. How much adjustment is needed depends on the relative brightness of the object and the size of the object. Required adjustments of 1 to 2 stops are common. In practical situations it is best to experiment somewhat with this. Many cameras allow exposure adjustments in steps of � stop or ⅓ stop.
![]()
Image post processing
A bad image never can be transformed into a good image, but a good image can be made into an even better image with careful and subtle image post processing. Two techniques which really enhance an image are cropping and sharpening. Cropping (and possible rotation) can make images better by improving composition or by allowing one to zoom into part of the picture. This works nicely for well-focused images. Sharpening is another technique, which can be used well for rendering sparkle and glitter better than what can be obtained with standard pictures. Sharpening only can be successfully applied when the camera itself does not do lots of internal processing on the images, otherwise the resulting images suffer from bad artifacts.
Cropping
What can be reached with cropping is shown by an example. A small sample of osmium metal was photographed in daylight conditions. No full image coverage could be obtained, due to the small size of the sample without having the camera totally blocking the direct daylight. So, it was decided to take a picture from a larger distance, but with good light, such that blue/grey reflections which are so typical for the metal are rendered well in the picture. The resulting picture was scaled to fit a webpage. The result is the following (click the image to download the full size 7 MPixel image, so you can experiment on your own with the information, given further below):
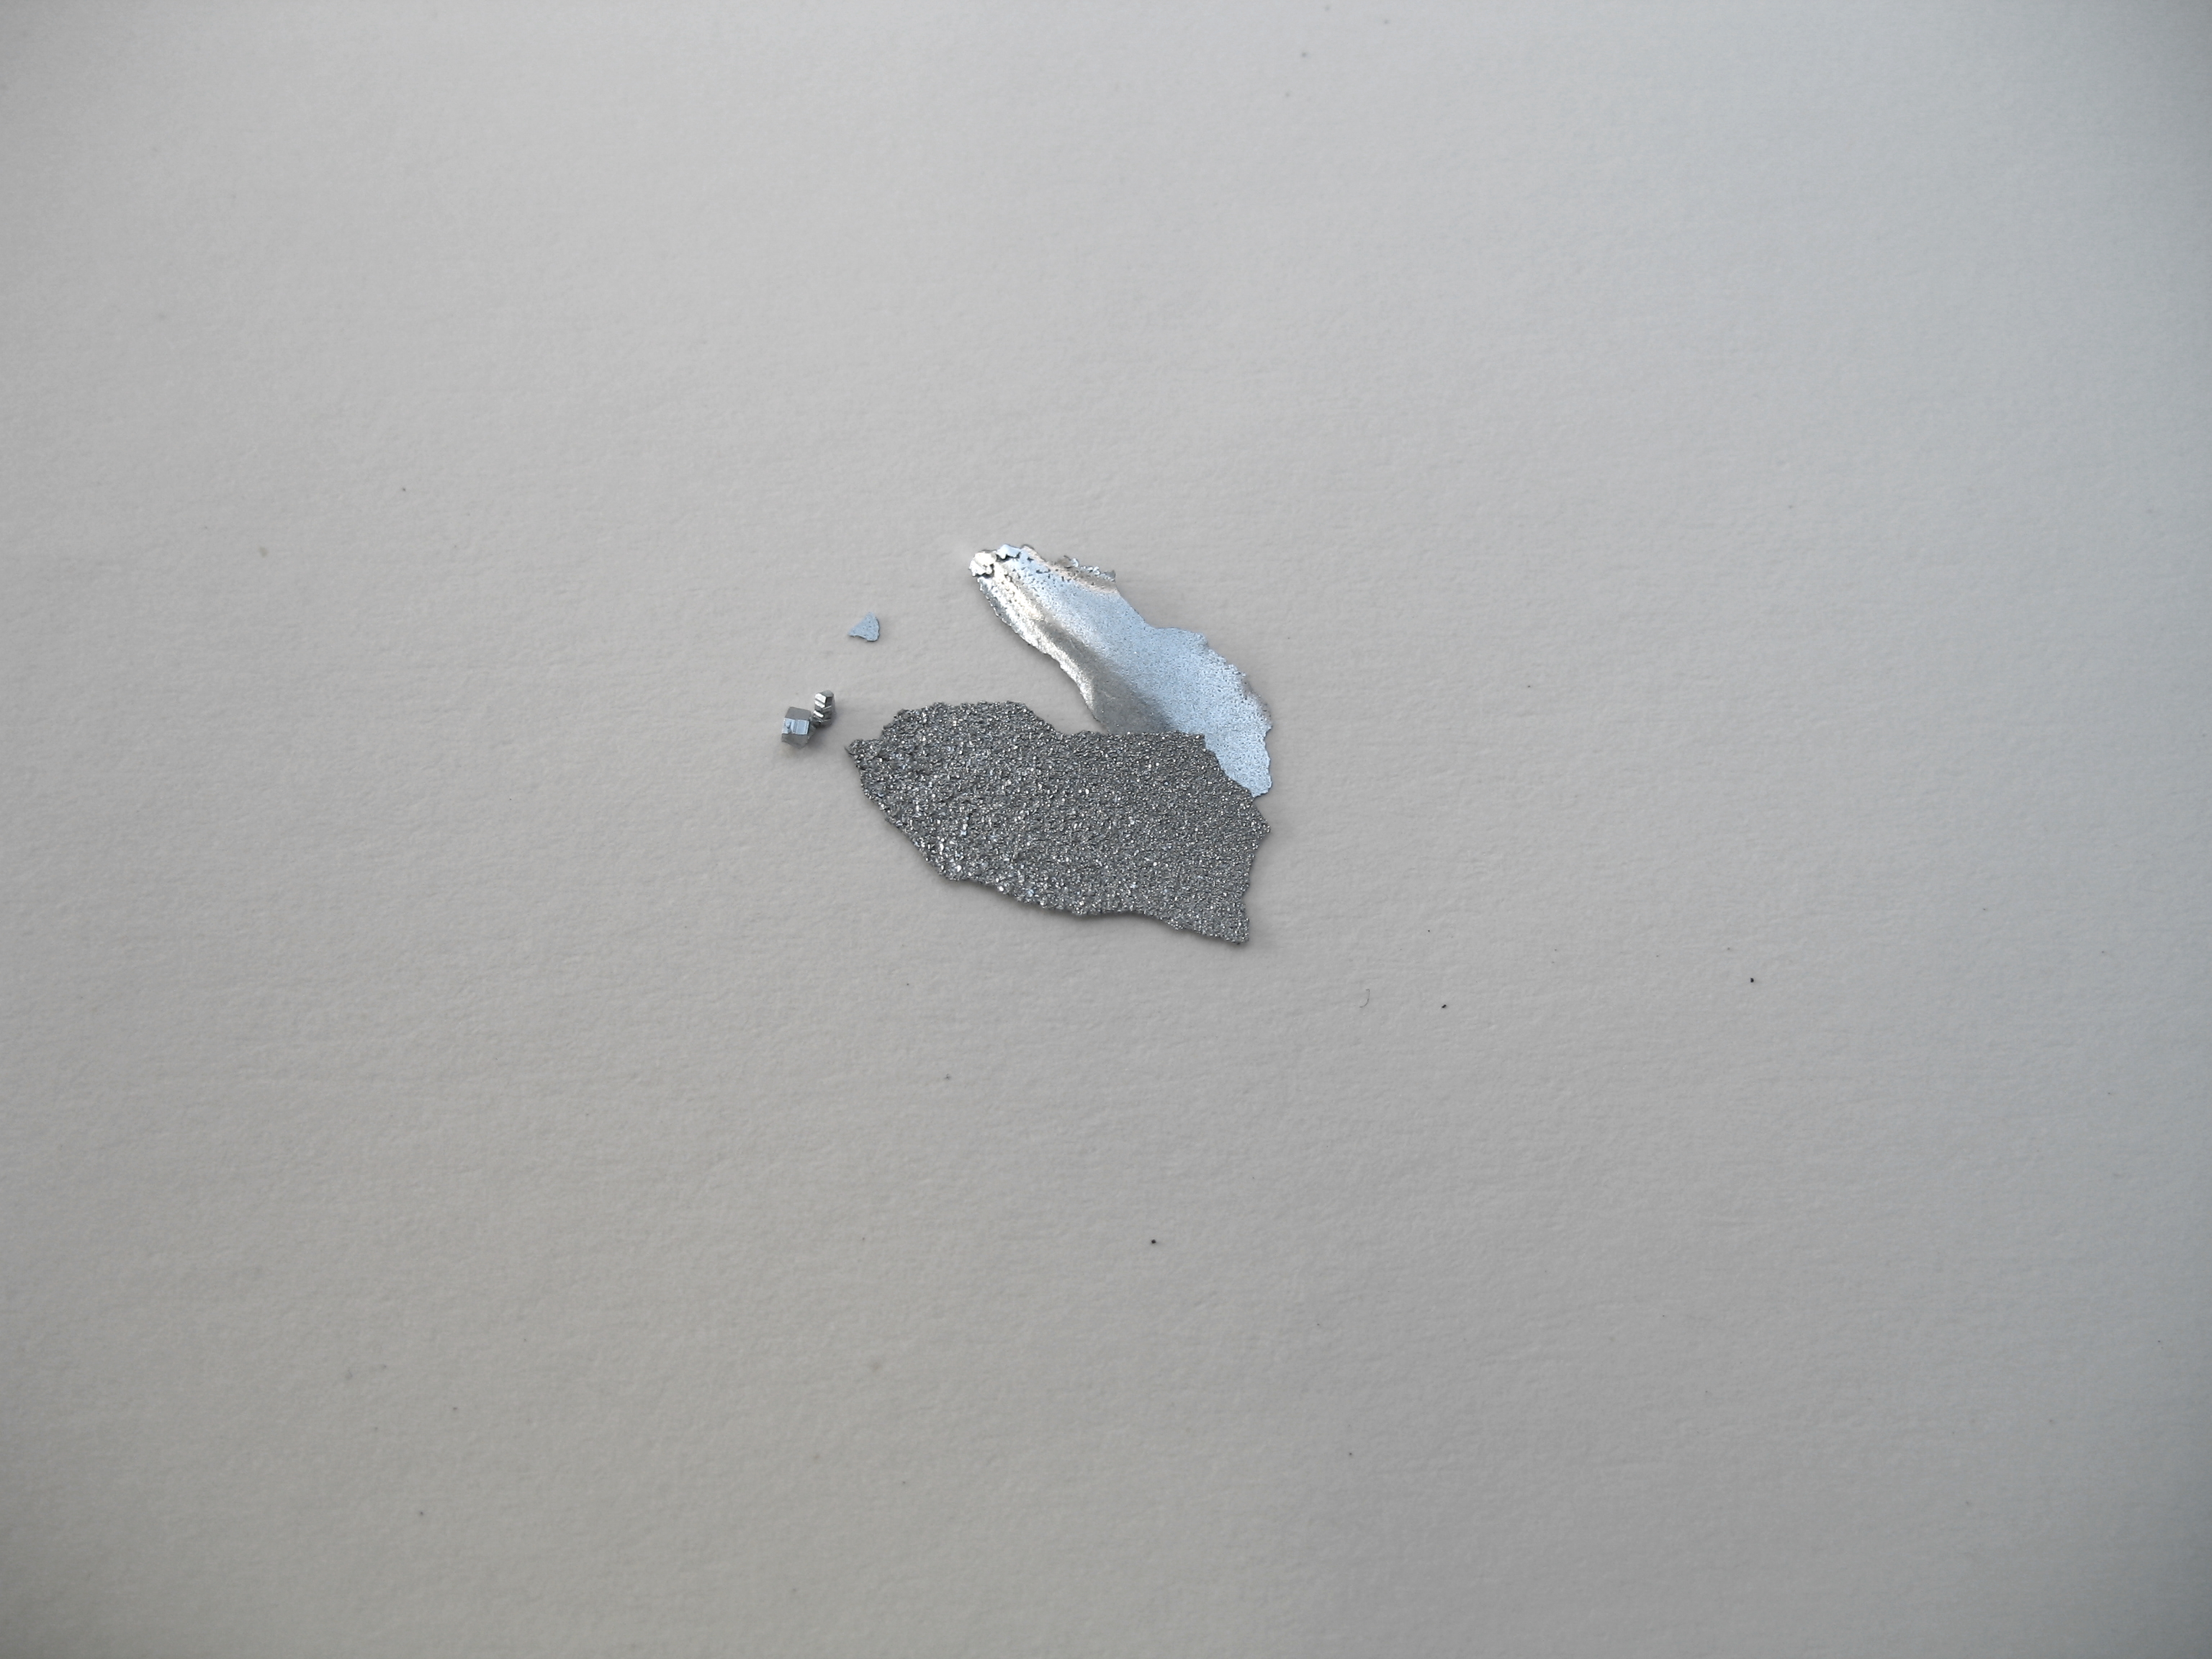
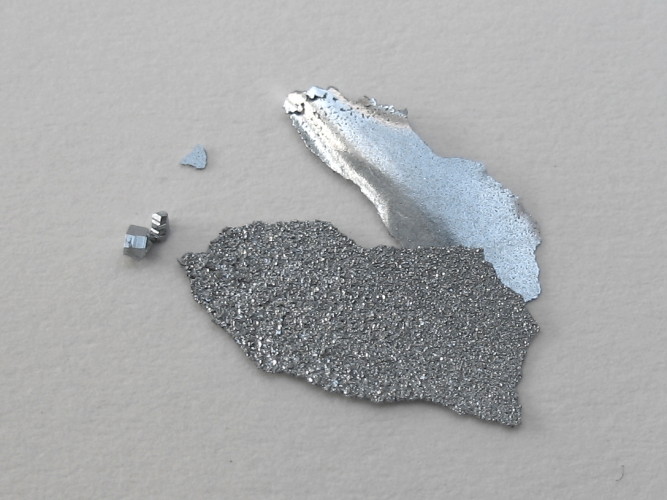
This image is not impressive at all. But when it is cropped and scaled again to fit the webpage, then one already gets a much nicer result. This picture nicely shows features of the metal, such as the bluish/grey reflection of light, and the rough crystalline structure of the surface of the lower sample.
Sharpening
Although the resulting image now already looks nice, it still can be improved more. The camera, with which this image was made, can be set such that it hardly does any internal image processing besides conversion to jpeg and saving to flash memory. This allows one to use computer imaging software to do post processing. The scaled image can be sharpened somewhat, such that features even better show up in the picture. The result is shown here. Compare this with the picture above and then you'll see that the image gains impact. It becomes more dynamic and sparkling. The effect is subtle, but definitely visible.
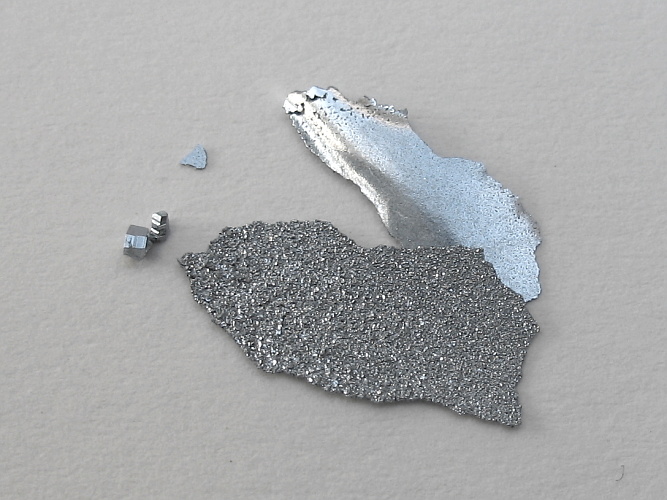
One has to be careful with sharpening of images. When an image is sharpened too much, then nasty craquel� effects appear in the picture, which make it look ugly.
Sharpening has one major drawback, it increases file size for the same image. Compression techniques for jpeg work best for smooth color transitions in images and when there are more sharp color transitions in an image, then the resulting file is larger on disk (provided the resolution and level of compression are kept the same for the image when it is saved to disk).
Order of image processing steps
When images are post processed to enhance them, then do the image processing in the following order.
- Color adjustment and/or lighting adjustment. Only perform these steps when necessary. Try to avoid the need for this step and choose good lighting conditions when the picture is made. For static samples and for reactions, which are running slowly or which have reached equilibrium, one has enough time to make a setup for good lighting conditions. One can also make many pictures with slightly different camera settings and positions of subject and then one can select the best image. Sometimes, however, in high speed situations, one simply has to shoot and one does not have a second chance. In such cases, this processing step can come in handy.
- Geometric transformations like rotation or perspective correction. Again, this step should not really be necessary, but on a high-resolution original image this is not really a problem and one can perform this step if desired. If this step is performed, then one almost always uses cropping as well.
- Cropping of the image. A rotated image or an image with perspective correction can be hard to crop in a satisfactory way, because such images usually are not rectangular anymore with horizontal and vertical borders. After this step it is wise to save a copy of the post processed image.
- Scaling down of the image is the most "destructive" step of post processing. A lot of information is lost in this step. Never ever perform scaling down before any of the other steps, mentioned above.
- Finally, an image can be sharpened. The sharpening must be done after scaling. If it is done before scaling, then the effect will be largely undone in the scaling step and one would need to perform this step another time.
Steps (1) and (2) can sometimes be interchanged, but all other steps really should be done in the order, given above.
![]()
Choice of camera
When a camera is purchased with the intent that it also is used for making chemistry-related pictures, then one should pay special attention to the macro capabilities of the camera. Unfortunately, the common review sites usually only take into account how strong a close-up one can make of subjects like stamps, coins or watches. These tests do not tell much about how well it will perform in making chemistry-related pictures.
Sometimes, the distance of subject to lens is specified for the macro setting of a camera. Select a camera with a number as large as possible. To give an impression:
- Pentax Optio S : Macro setting, minimum focus distance 55 mm
- Canon Powershot A620: Macro setting, minimum focus distance 10 mm
When the Canon Powershot is not allowed to be closer to the subject than 55 mm, then its best image coverage is much smaller than with the Pentax Optio S. So, coverage information alone is not sufficient. If you go to a camera shop, take a die or even a few differently sized dice with you and make pictures from them. An average die has a size similar to the things one will encounter in chemistry.
The cameras mentioned above are not available on the market anymore, they appeared several years ago, but similar cameras with more megapixels and faster internal processors and more memory are available now. Do research on your own and base your decision on that. It might be that current Optio cameras have totally different macro properties, so please do not take the information about these two cameras too seriously.
![]()
Video and images from videos
A complete new dimension is added to chemistry-photography when one can make digital videos of experiments of decent image quality. Most modern cameras now have at least 640x480 resolution at 30 Hz and things now even shift to 1024x768 resolution at 30 Hz.
When making videos, then one MUST put the camera on a tripod. Nothing is more disturbing than a shaking image. So, when selecting a camera, one also has to select one with a screw connection for a tripod. Without such a connection it is useless for making serious videos.
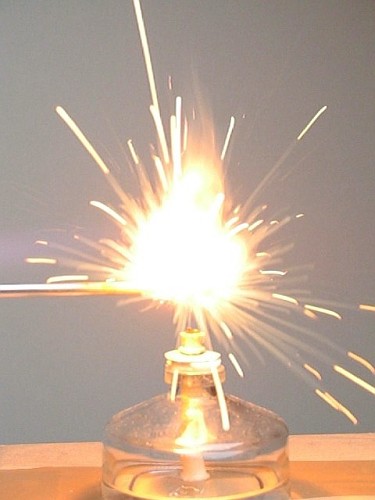
Another great option with videos is the possibility to take single frames and use these as photographs. The image quality is much less than the photo quality of most cameras, but still, many really interesting pictures can be made. High speed and very short lasting phenomena can be captured with a digital video. Below, two examples are given. The left is the extremely violent reaction of a solid periodate with a concentrated solution of hydrazine dihydrochloride and the white glitters in the air are tiny glittering crystals of solid iodine in sunlight, condensing from the vapor. At the right one can see how a flame fills a flask, which is filled with an alcohol-air mix. Both processes only take a fraction of a second, are very spectacular to watch and almost impossible to catch with a still-image camera. A video camera on a tripod, however easily captures this kind of beautiful images.
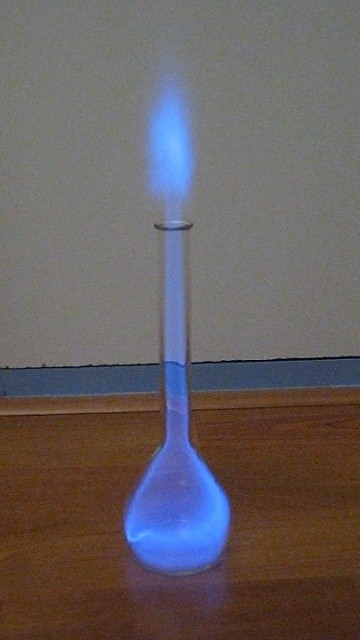
Images like these are not as good and sharp as still-photographs, but with some post processing such as sharpening and contrast changes one usually can make very decent pictures.
back to main miscellaneous page