


Self-igniting gas, made from sand and magnesium
This experiment is rather spectacular while it can be performed with very common chemicals. It also can be done safely, as long as the precautions given in the text below are taken into account. The second part of this experiment also is very suitable for classroom demonstrations or other chemistry demonstration events.
In the experiment, first some (impure) magnesium silicide is prepared. After cooling down of the material, it is crushed and small granules of the material are thrown in dilute hydrochloric acid, which gives a pleasing and spectacular effect of crackling and popping flashes of fire.
![]()
![]() Required
chemicals:
Required
chemicals:
-
magnesium powder
-
silicon dioxide (very fine sand)
-
hydrochloric acid
-
hydrogen peroxide
-
potassium permanganate or manganese dioxide
![]() Required
equipment:
Required
equipment:
- test tubes (one of the test tube will be destroyed, so use a dirty/old one)
- watch glass or petri dish
- small but hot burner, used for heating a test tube
- clamp to hold the test tube while it is heated
- pair of tweezers with flat tip for easy mechanical separation of glass splinters and reaction product
![]() Safety:
Safety:
- Magnesium powder is flammable.
- The reaction product gives self igniting gas with acids.
- Perform the heating part of the experiment outside. If the hot test tube accidently cracks, then this will result in instant extremely hot fire due to the fine magnesium powder. All other parts of the experiment can be done inside in a well-ventilated room, as long as the amounts, used in the experiment are not too large.
![]() Disposal:
Disposal:
- The cracked test tube may contain tiny specks of highly flammable material. Rinse the glass waste and possible other waste with some dilute hydrochloric acid and then with water before throwing it in the trash bin.
![]()
Preparation of magnesium silicide
In the first part of the experiment, magnesium silicide is made from very fine sand and fine magnesium powder. The sand can be purchased in some pet shops as fine 'silver sand' and in ceramics suppliers as powdered silicon dioxide. The sand does not need to be very pure, but the finer it is, the better.
![]() Weigh
out 500 mg of magnesium powder and put the powder in a perfectly dry test tube.
Use an old/dirty test tube. The test tube will not survive the experiment.
Weigh
out 500 mg of magnesium powder and put the powder in a perfectly dry test tube.
Use an old/dirty test tube. The test tube will not survive the experiment.
![]() Also
weigh out approximately 500 mg of the fine sand powder. The sand powder must be
thoroughly dried. This can be done by putting it in a petri dish and leaving it
standing on a hot heating radiator for one day. This preparative step is of
utmost importance. Using damp or moist sand may lead to eruption of the entire
mass from the test tube when it is strongly heated. After the drying, the
sand must be a perfectly dry free flowing powder.
Also
weigh out approximately 500 mg of the fine sand powder. The sand powder must be
thoroughly dried. This can be done by putting it in a petri dish and leaving it
standing on a hot heating radiator for one day. This preparative step is of
utmost importance. Using damp or moist sand may lead to eruption of the entire
mass from the test tube when it is strongly heated. After the drying, the
sand must be a perfectly dry free flowing powder.
![]() Take 300
mg of the perfectly dry sand and add this to the magnesium powder and swirl the
test tube, such that the magnesium and sand are mixed well. It is important that
the Mg : SiO2 ratio is close to 5 : 3.
Take 300
mg of the perfectly dry sand and add this to the magnesium powder and swirl the
test tube, such that the magnesium and sand are mixed well. It is important that
the Mg : SiO2 ratio is close to 5 : 3.
![]() Take the
remaining sand and put this in the test tube as well, such that it forms a layer
on top of the magnesium/sand mix. If the sand does not completely cover the mix,
then add a little more. The total amount used is not critical at all. This layer
of sand assures that the magnesium does not accidently ignite when it is heated.
Take the
remaining sand and put this in the test tube as well, such that it forms a layer
on top of the magnesium/sand mix. If the sand does not completely cover the mix,
then add a little more. The total amount used is not critical at all. This layer
of sand assures that the magnesium does not accidently ignite when it is heated.
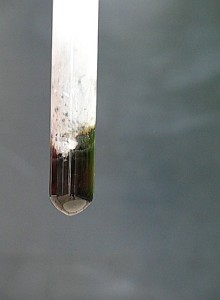
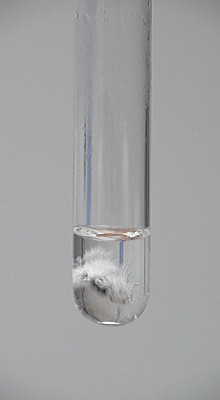
The test tube with the mix and covering layer should look like this:
The test tube used in this experiment was really bad. It was used in different experiment with fluorides and was severely etched on the inside. Such a test tube has a worthy end of its life in the experiment of making magnesium silicide.
![]() Put the
test tube in a clamp and heat it with a flame of a propane torch and keep some
distance while the burner is heating the test tube. Do this heating in a
place where accidental cracking of the test tube does not lead to dangerous
situations. If the test tube cracks, then the fine magnesium powder will burn in
a white hot fire ball!
Put the
test tube in a clamp and heat it with a flame of a propane torch and keep some
distance while the burner is heating the test tube. Do this heating in a
place where accidental cracking of the test tube does not lead to dangerous
situations. If the test tube cracks, then the fine magnesium powder will burn in
a white hot fire ball!
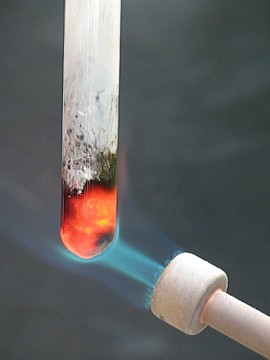
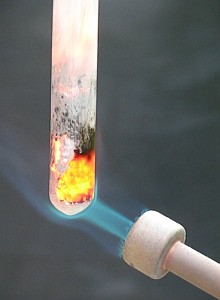
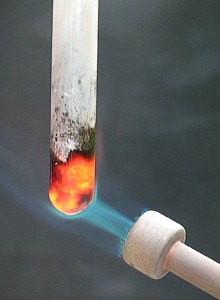
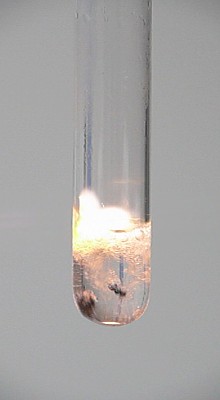
The heating of the test tube results in a sudden and fairly violent reaction. One can see a glow going quickly through the sand/magnesium mix. The reaction starts at a spot somewhere on the side of the test tube (where heating is strongest) and then in less than one second the entire mass has reacted. It also expands somewhat during the reaction. The following three pictures show the setup, used for heating and the reaction which occurred. The middle picture nicely shows how part of the magnesium/sand mix has reacted, while other parts still are present as light grey powder. In the right picture all of the mix has reacted. The layer of sand on top of the magnesium/sand mix is blown upwards and most of it sticks to the glass walls of the test tube.
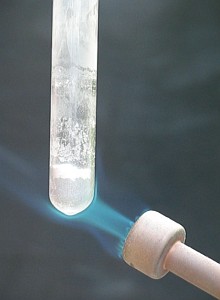
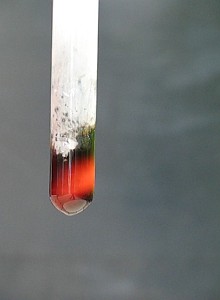
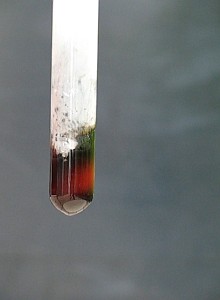
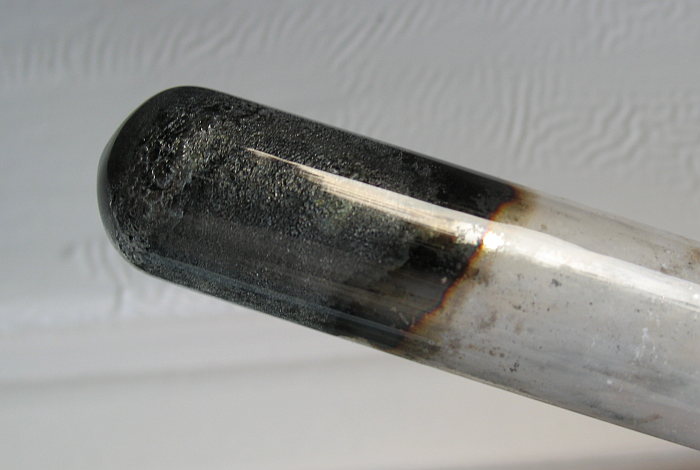
![]() When the
reaction is over, quickly take away the burner and then let the mix cool down
for at least 15 minutes. Just leave the test tube in the clamp during this
period. The following three pictures show the cooling down of the material. The
green hue in the pictures is due to reflection of green light from trees at the
right of the place where the experiment was performed. It is not something in
the test tube. The glass above the black mass is totally white. This is due to
the sand, which is blown upwards during the reaction.
When the
reaction is over, quickly take away the burner and then let the mix cool down
for at least 15 minutes. Just leave the test tube in the clamp during this
period. The following three pictures show the cooling down of the material. The
green hue in the pictures is due to reflection of green light from trees at the
right of the place where the experiment was performed. It is not something in
the test tube. The glass above the black mass is totally white. This is due to
the sand, which is blown upwards during the reaction.
A video was made of the heating process and the reaction. The download size of the video is approximately 3.8 MByte. Download the video by clinking here. The video also shows that the layer of sand, which covers the sand/magnesium mix moves upwards when the test tube it heated and then falls back again, before the reaction sets in. This probably is due to expansion of air between the particles of the sand/magnesium mix, or due to remains of water in the sand/magnesium mix.
After cooling down, a solid mass is in the bottom of the test tube, it does not fall out of the test tube, when it is kept upside down, but the mass is not glassy, it is more like rough granules and it contains quite some air.
![]() When the
material has cooled down completely, then take the test tube out of its clamp.
Wrap the test tube in a few layers of plastic bag and carefully hit with a
hammer on the black part. The test tube shatters and pieces of glass, mixed with
dark grey granules are in the plastic bag. The plastic bag prevents spraying
around of splinters of glass and particles of magnesium silicide.
When the
material has cooled down completely, then take the test tube out of its clamp.
Wrap the test tube in a few layers of plastic bag and carefully hit with a
hammer on the black part. The test tube shatters and pieces of glass, mixed with
dark grey granules are in the plastic bag. The plastic bag prevents spraying
around of splinters of glass and particles of magnesium silicide.
![]() Carefully put the material on a petri dish and take away the
largest splinters of glass and keep the remaining material. The splinters of
glass must be treated with some dilute hydrochloric acid, before they are thrown
in the trash bin. Use a pair of tweezers to take out the splinters of glass. Do
not touch the material. Humidity from the skin may lead to degradation of the
material.
Carefully put the material on a petri dish and take away the
largest splinters of glass and keep the remaining material. The splinters of
glass must be treated with some dilute hydrochloric acid, before they are thrown
in the trash bin. Use a pair of tweezers to take out the splinters of glass. Do
not touch the material. Humidity from the skin may lead to degradation of the
material.
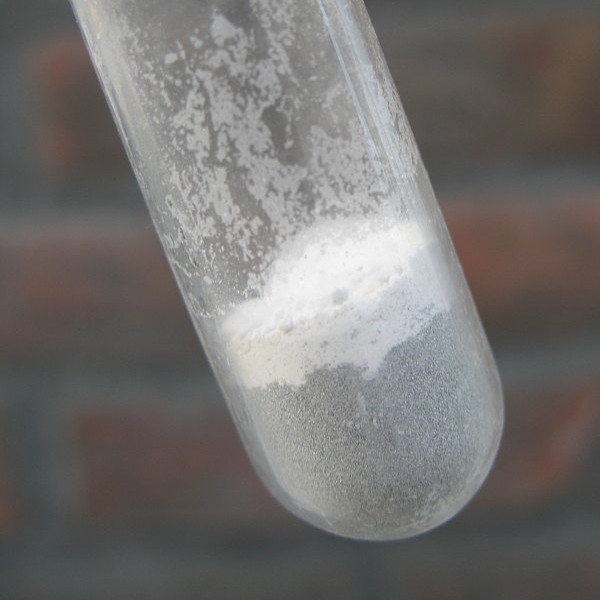
The remaining material can be put in a small vial, which is tightly closed. A small sample of the material is shown in the picture below. It also shows some remaining small glass splinters. The impure magnesium silicide is grey with a somewhat bluish hue. It is rather impure material, it also contains quite some MgO.
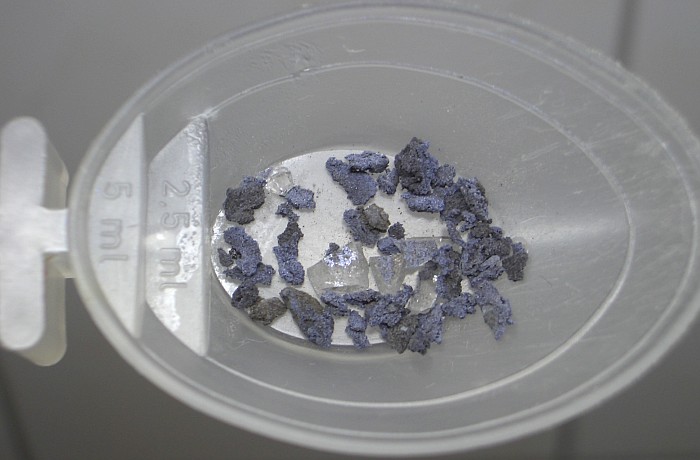
If the material is kept in a tightly closed small vial, then it can be kept indefinitely for future experiments. This material has rather interesting properties, as will be shown in the experiment description further below.
![]()
Self-igniting gas: silane
The material, which is prepared from the sand/magnesium mix, is a mix of magnesium silicide and magnesium oxide in a 1 : 2 stoichiometric ratio. When this is added to dilute acids (e.g. 10% HCl or 10% H2SO4), then bubbles of gas are produced which immediately catch fire when they come in contact with air. The burning of this gas is occurring with explosive violence and this results in a crackling noise when many tiny bubbles of gas ignite at (almost) the same time. Simply throwing some of the material in a small quantity of dilute hydrochloric acid results in lots of crackling and flashing. Sometimes there are larger bursts, sometimes there are many small specks of fire.

A big burst of fire occurs, when many tiny bubbles combine into a big bubble. When the big bubble breaks, then the gas in it is released and a bigger flame is produced. The tiny specks are produced when small bubbles of gas break.
Two videos are made of the crackling and the flashes of fire:
![]()
More powerful reaction in pure oxygen
A rather spectacular effect is obtained when magnesium silicide is add to acid, which is under pure oxygen instead of air. The flashes in that case are much brighter and more white instead of orange. This experiment can best be done on a test tube scale.
![]() Put
approximately 10 ml of hydrogen peroxide (3% by weight) in a large test tube and
add a pinch of potassium permanganate or manganese dioxide and loosely stopper
the test tube. Oxygen is produced vigorously, especially if potassium
permanganate is used.
Put
approximately 10 ml of hydrogen peroxide (3% by weight) in a large test tube and
add a pinch of potassium permanganate or manganese dioxide and loosely stopper
the test tube. Oxygen is produced vigorously, especially if potassium
permanganate is used.
![]() When the
production of oxygen ceases, then bubble the gas into a clean test tube under
water which is kept upside down and full of water. When that test tube is
completely filled with oxygen (all water is replaced by oxygen gas), then tightly stopper it and take it out of the water. Make it
dry on the outside.
When the
production of oxygen ceases, then bubble the gas into a clean test tube under
water which is kept upside down and full of water. When that test tube is
completely filled with oxygen (all water is replaced by oxygen gas), then tightly stopper it and take it out of the water. Make it
dry on the outside.
![]() Put the
test tube in a clamp, remove the stopper and quickly pour in a few ml of dilute
hydrochloric acid (10% .. 15% by weight is suitable).
Put the
test tube in a clamp, remove the stopper and quickly pour in a few ml of dilute
hydrochloric acid (10% .. 15% by weight is suitable).
![]() Next,
add a few granules of the MgO/Mg2Si mix, prepared according to the
method, described above. This results in a loud crackling noise, accompanied
with bright flashes.
Next,
add a few granules of the MgO/Mg2Si mix, prepared according to the
method, described above. This results in a loud crackling noise, accompanied
with bright flashes.
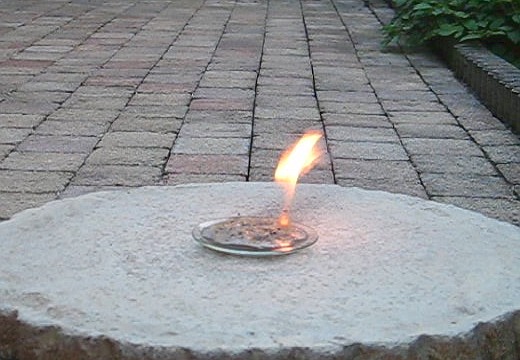
The three pictures below show the addition of a single granule of MgO/Mg2Si. In the left picture the granule goes under the surface and a lot of bubbles are produced. As soon as these bubbles reach the surface of the liquid they ignite with a bright flash of light. The granule of MgO/Mg2Si breaks apart in smaller parts. After a while, when there have been a lot of miniature explosions, an orange/yellow solid remains sticking on the glass and floating on the surface of the dilute acid.

A short video of this reaction is available as well. Download size is appr. 1.8 MByte.
![]()
Collecting silane over water in an inverted test tube
Some of the silane gas was prepared in a syringe, using a special technique, allowing the gas to be collected under water:
- Put some of the magnesium silicide in a dry syringe and press air out of the syringe, but do not completely crush the pieces of magnesium silicide. So, a small amount of air is left in the syringe.
- Attach a 20 cm long thin flexible rubber tube to the tip of the syringe.
- Suck in a fairly large amount of cold tap water, such that all of the solid magnesium silicide is in the water. There also will be a bubble of air in the syringe (air from the thin flexible tube and some air which already was present in the syringe).
- Now carefully press out water from the syringe, but do this in such a way that first the bubble of air is pressed out, and then water. No magnesium silicide should be pressed out of the syringe. Press out so much water, that the magnesium silicide is trapped between the front side of the syringe and the plunger. It should not be crushed. The little flexible tube also must be completely filled with water.
- Prepare a 15% solution of hydrochloride acid (10 ml or so is enough). Quickly draw some of this acid in the syringe through the flexible tube and assure that no bubbles of air are drawn into the syringe.
- Immediately after drawing some acid in the syringe tightly fold the flexible tube, such that no liquid or gas can pass. When this is done, then the plunger slowly is driven outwards. Allow gas to be formed, until the syringe is almost full. Then release the flexible tube under water and let additional bubbles of gas escape under water. This may be somewhat scary, because most of the bubbles will explode on the water surface, but this is harmless.
- When production of gas ceases, then you have some of the gas for further experimenting.
Some of the gas was collected under water in an inverted test tube and allowed to stand for a few days. Collecting the gas in a test tube is easy. Take a test tube, fill it with water and keep it inverted under water in a large tub. Push the flexible tube of the syringe inside the inverted test tube, as high as possible and then slowly press out the gas. Avoid long bubbling trajectories through the water, so it is important to keep the flexible tube as high in the test tube as possible.
After this is done, the test tube can be stoppered and the gas can be stored in that test tube, upside down, with the stoppered side under water in a beaker.
After a few days of storage, the water surface inside the test tube is covered by a thin layer of white solid material, which has surprising strength. Even when the test tube is almost kept horizontally, the surface of the water does not break.
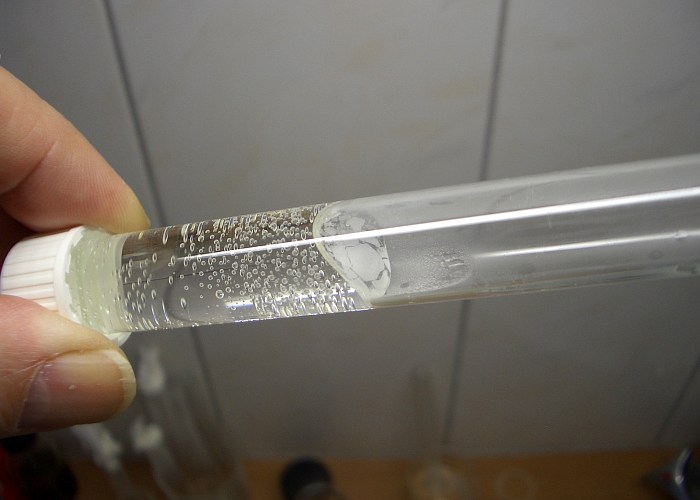
This thin layer consists of silicon dioxide, which is formed on the water surface, due to the presence of dissolved oxygen in the water. This oxygen slowly is released to the gas phase and this reacts with the silane gas. The silicon dioxide, formed in this slow reaction is deposited on the water surface.
When the test tube with the silane gas is opened and air is allowed to enter the test tube, then the gas bursts in flames at once. Only do this with the test tube in the normal orientation (open end upwards) and then remove the stopper. If it is kept inverted, then a big bubble of air goes into the test tube and the resulting explosion then may shatter the glass!
![]()
Discussion of results
![]() When magnesium is heated with silicon dioxide, then at sufficiently high
temperature the following exothermic reaction occurs:
When magnesium is heated with silicon dioxide, then at sufficiently high
temperature the following exothermic reaction occurs:
2Mg + SiO2 → 2MgO + Si + energy
If more magnesium is present, then that reacts with the silicon in another exothermic reaction:
2Mg + Si → Mg2Si + energy
The net reaction is:
4Mg + SiO2 → 2MgO + Mg2Si + energy
The energy produced in the total reaction is sufficient to make the entire reaction mix glow. If elemental silicon and magnesium were used instead of sand and magnesium, then one could obtain pure Mg2Si, but the reaction is so exothermic that it is rather dangerous and hard to keep controlled.
In the net reaction, for each 500 mg of magnesium, 309 mg of silicon dioxide is used.
![]() Magnesium silicide reacts with acids, giving a mix of many different compounds.
The main reaction, which occurs is the following:
Magnesium silicide reacts with acids, giving a mix of many different compounds.
The main reaction, which occurs is the following:
Mg2Si(s) + 4H+(aq) → Mg2+(aq) + SiH4(g)
The gas SiH4 is the simplest and first member of a class of compounds called silanes. Silanes are the silicon equivalents of alkanes. The simplest silane is SiH4 and this colorless gas frequently is called monosilane or simply silane.
There are several side reactions though. Besides gaseous SiH4 higher silanes are produced as well, such as Si2H6 and Si3H8. Hydrogen gas also is produced. So, the reaction between magnesium silicide and acid is not a clean and stoichiometrically well determined reaction, but many different reactions occur at the same time.
Silanes are much more reactive than the corresponding alkanes. SiH4 is extremely flammable and in many cases, this gas ignites, when it comes in contact with air. The higher silanes are even more reactive and SiH4, contaminated with higher silanes, as produced in this experiment, always ignites when it comes in contact with air. When the gas burns in air (or pure oxygen), then the following main reaction occurs:
SiH4(g) + 2O2(g) → SiO2(s) + 2H2O(g)
The SiO2 can be observed as white smoke.
Again, there are several side reactions when the silane is burning. At the high temperatures involved in the burning process, silane also decomposes, giving silicon and all kinds of ill-defined polymeric Si-O/H species. These compounds are solids with colors ranging from yellow to brown. This explains the formation of the orange solid, when silanes are burnt in a test tube.