


Decomposition of water -- detonating gas
Many people know that water can be decomposed into its constituting elements, hydrogen and oxygen. Many of you, who are reading this page, probably have done the simple electrolysis experiment of sticking two wires in a salt solution, and connecting these to a battery. The experiment, described on this page, is a little bit more involved, but it certainly can be done at home. The setup of this experiment nicely shows some important aspects of the electrolysis experiment, such as the precise 1 : 2 ratio for produced oxygen and hydrogen.
After some water is decomposed, the two gases are mixed and then the mix is ignited. This is really impressive. Even small amounts of gas already give a remarkably loud bang.
The experiment is conducted, using a special apparatus for making the gases, constructed from a U-tube with some aquarium-tubing and rubber stoppers.

The gases are collected in inverted test tubes and after that they are mixed and ignited.
![]()
![]() Required
chemicals:
Required
chemicals:
-
sulphuric acid
-
dish washing soap
![]() Required
equipment:
Required
equipment:
-
test tubes + stoppers or caps
-
U-tube with side arms
-
rubber tubing, as thin as possible
-
big beaker, tub or something else, in which inverted test tubes can be put
-
power supply 12 .. 15 V and current limiting power resistor
![]() Safety:
Safety:
- A mix of hydrogen and oxygen is extremely explosive. Do not mix more than a few tens of ml of gas and never ignite such a mix when it is contained in a test tube or another glass object.
- Dilute sulphuric acid is corrosive. In case of contact, immediately rinse with a lot of water.
![]() Disposal:
Disposal:
- After use, the dilute acid solution can be flushed down the drain. It can also be stored for later similar experiments. It hardly is contaminated during the experiment.
![]()
Constructing the apparatus for this experiment
Most convenient and easiest to setup is an apparatus built around a glass U-tube with side arms, but if such a tube is not available, then one can use a piece of PVC-tube, bent in a U-shape, with two holes drilled at the side, and thinner flexible PVC-tube glued in the holes.
In this experiment, a glass U-tube is used. Two little 15 mm stoppers were punched with a needle. At the cathode side (negative pole), the needle was firmly pressed in a piece of copper wire (thick loudspeaker wire). At the anode side, some thin platinum wire was threaded through the eye of a needle and the needle was firmly pressed through the rubber stopper, such that the eye of the needle is completely embedded in the rubber stopper. Some PVC-glue was used to make both the anode and the cathode completely air-tight and liquid-tight at the bottom side in order to prevent corrosion of the needle. The complete apparatus looks as follows:
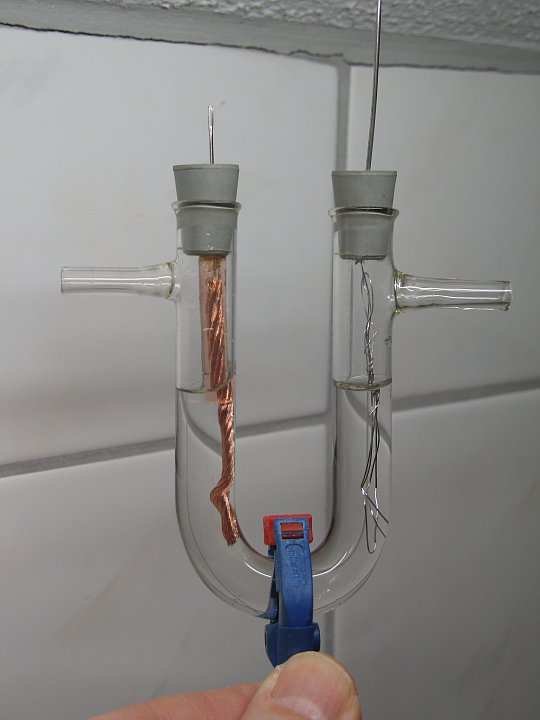
Instead of thin platinum wire, one also can use a thin long graphite rod, with a hole drilled into the stopper, but such a rod slowly erodes when it is used as anode. For making several test tubes full of gas, a graphite rod is perfectly suitable though. Do not use copper wire or iron nail as anode. No gas will be produced with these, when they are used as anode.
To the side-arms, some thin tubing is attached. The side-arms are fairly thick, first a wide piece of rubber tubing is used, and then a very thin piece of tubing is used, which fits in the wider tubing. This is shown in the picture above, at the start of this webpage.
The total setup for the experiment is shown in the following picture:
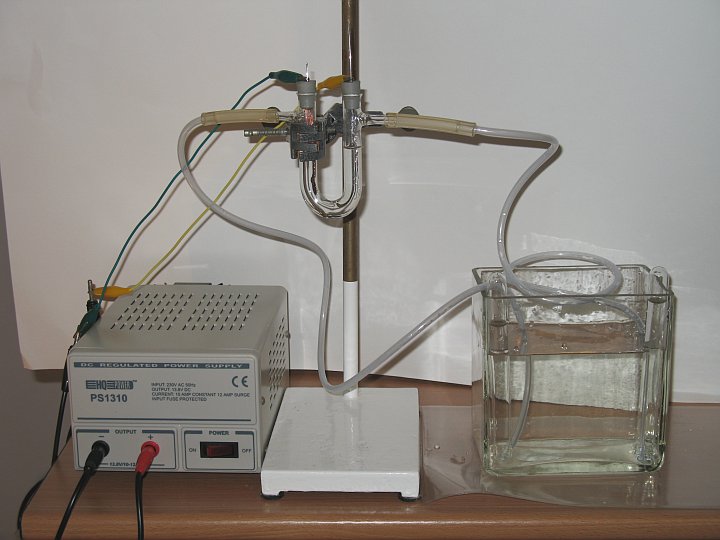
The power supply for the electrolysis is a 13.8 V fixed voltage power supply. This is connected to the two needles, which are punched through the rubber stoppers. The negative pole (green crocodile clamp in picture above) is connected to the copper-side, the positive pole (yellow crocodile clamp in picture above) is connected to the platinum-side or graphite-side. The power supply is not connected directly though, a series resistor (ceramic power resistor 4.7Ω, 25 Watt) is used in order to limit the current through the cell.
The U-tube is small, and when it is filled with liquid, only approximately 15 ml of liquid is needed to fill the apparatus. The pictures above show an ideal filling level. Filling with more liquid is not suitable. In that case, one runs the risk of liquid overflow and liquid going into one of the side arms.
The gases, produced during electrolysis are lead through the flexible tubing and gas bubbles are collected in inverted test tubes, which are in the water tank, at the right of the setup.
When the apparatus is switched on, then it first must be allowed to run for 5 minutes or so, before any gas is collected. This must be done in order to drive off any air, trapped in the apparatus and the flexible tubing.
![]()
Dilute sulphuric acid as electrolyte
Approximately 3 ml of concentrated sulphuric acid must be carefully added to 10 ml of water, while stirring. Be careful, a lot of heat is produced! Add more water, until a volume of 15 ml is obtained. After cooling down, this liquid is poured in the U-tube.
With the dilute sulphuric acid, and the electrodes, as shown in the pictures above, a current is obtained, somewhere around 1 A. In this particular experiment, a current was observed of approximately 1.2 A. As soon as the power supply is switched on, there is a lot of bubbling and a hissing noise is produced. A video of the working apparatus can be downloaded by clicking here, download size is appr. 6 MByte.
Before any gas is collected in a test tube, the apparatus first must be allowed to run for 5 minutes or so, with both open ends of the thin tubing immersed in the water tank. During this period, any air in the U-tube and the thin flexible tubing is driven out and replaced by the gases produced in the electrolysis experiment. It is important to have either both open ends of the flexible tubing under water, or both of them in air. If one is in water, and the other in air, then switching on of the power supply results in pressing of the liquid in the U-tube towards the side, which has its open end in air.
After these 5 minutes, inverted test tubes, full of water, are kept above the open ends of the thin tubing and bubbles of gas are collected. The setup, with gas bubbles and some collected gas is shown in the picture below:
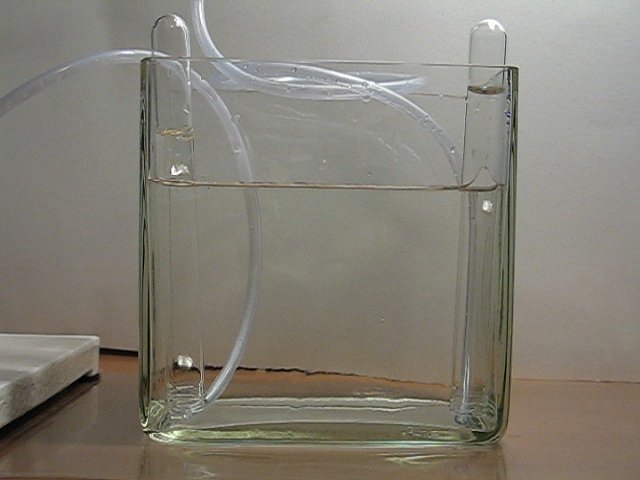
The picture shows two test tubes. The left test tube collects gas, produced at the cathode, the right test tube collects gas, produced at the anode. One can see that the test tube at the left has two times as much of gas as the test tube on the right. A video, showing almost 80 seconds of bubbling demonstrates the speed at which the test tubes are filled (download size is appr. 4.3 MByte). It takes approximately 3 minutes before the left test tube is filled completely with gas.
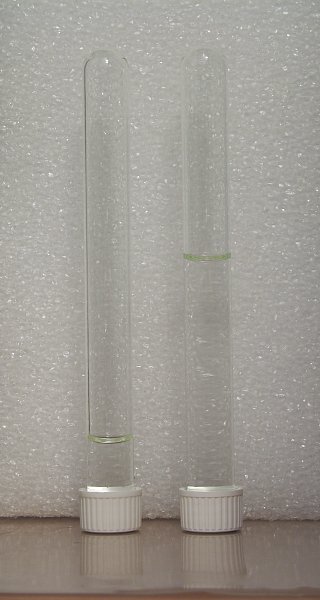
The experiment very nicely demonstrates that the gases are produced in a precise volume ratio, Vcathode : Vanode = 2 : 1. The picture below shows the two test tubes with collected gas. The left is the test tube with cathode gas, and the right is the test tube with anode gas.
Mixing the gases and igniting the mix
When the left test tube is almost full of gas, then the power supply must be switched off and then both test tubes should be taken out of the liquid. Either use a rubber stopper, or use test tubes with a screw-cap. Bubble the gas from both test tubes in a single small bottle. The bottle now contains a precise mix of both gases in a 2 : 1 volume ratio.
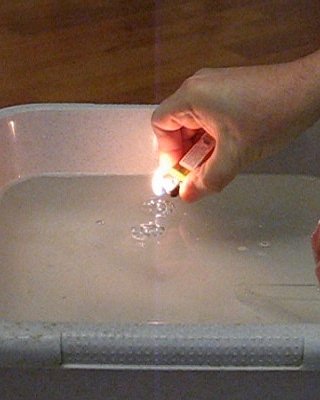
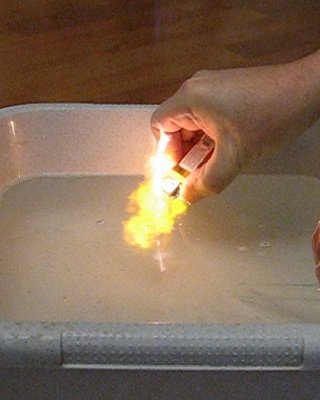
The gas mix from the bottle can be bubbled back into the test tubes with screw caps and these test tubes can be used in an experiment in which the gas mix is ignited. This is done most conveniently in a tub, filled with water, in which some dish washing soap is dissolved. The dish washing soap allows bubbles to survive on the surface for a sufficiently long time, such that they can be ignited. The two pictures below show bubbles on the surface of the water, just before ignition and just after ignition.
Two videos of this part of the experiment are available, in which varying amounts of gas mix are ignited. Both videos have a download size of approximately 6 MByte:
The videos show the remarkable explosion power of this gas mix. Only a few ml of gas mix is ignited (1 ml is appr. 0.4 mg of gas mix) and even such a tiny amount gives a loud bang. A mix of 20 ml, being one full test tube, gives a really loud bang. The sound of such a big bang is recorded and can be downloaded here.
![]()
Discussion of the results
The experiment with sulphuric acid as electrolyte is a classical one. It indeed works precisely as expected. Water is decomposed according to the following simplified net equations (in reality H+ is present in hydrated form, but that does not really matter here, hence the simple notation):
- at cathode: 4H+ + 4e → 2H2
- at anode: 2H2O – 4e → O2 + 4H+
At the anode, electrons are absorbed by the electrode, at the cathode, electrons are pushed into the solution by the electrode. The two reactions combined give the following net result:
4H+ + 4e + 2H2O – 4e → 2H2 + O2 + 4H+
Simplifying: 2H2O → 2H2 + O2
The gases are produced in an exact 2 : 1 volume ratio at the cathode and anode.
Mechanism of reaction
The equations, given above, are simply net equations. The real mechanism of formation of hydrogen and oxygen is much more involved and a simple explanation cannot be given.
Probably, at the cathode, first hydrated H+ ions are converted to atomic hydrogen radicals:
H+ + e → H·
and after this, two hydrogen atoms combine to diatomic molecules:
2H· → H2
At the anode, things are much more complicated. The net equations, shown above, show transfer of 4 electrons. This certainly does not occur in reality. The real reaction will be a sequence of reactions, derived from species in which only a single electron is transferred.
A possible reaction could be
H2O – e → [H2O]+ → H+ + HO·
The species HO· is extremely reactive. Two of these hydroxyl radicals can combine to hydrogen peroxide, but that only happens under certain conditions (low temperature, high concentration of acid, very high current density at the anode). Under other conditions, hydroxyl radicals combine as follows:
2HO· → H2O + O·
and the oxygen atoms in turn combine as follows: 2O· → O2
The mechanism, presented here, most likely still is overly simplified. Other radical species may be involved as well, such as HO2, HSO4, and SO4–, with reactions like
SO42– – e → SO4– , followed by SO4– + H2O → HSO4– + HO·
Quantitative results explained as well
One also can explain why it takes approximately 3 minutes to fill one test tube. The test tubes, used in this experiment, have a volume of 22 ml.
The observed current was 1.2 A. One mol of electrons is 96485 Coulomb of charge (Faraday's constant). With a current of 1.2 A (which is 1.2 Coulomb per second), the number of electrons, produced every second is
1.2/96485 = 1.24·10-5 mol.
For making one mol of H2, two mols of electrons are needed (see cathode equation, given above). So, the amount of hydrogen, produced per second is 0.62·10-5 mol. At standard pressure and temperature (1 atmosphere at 300 Kelvin), 1 mol of ideal gas has a volume of 22.4 liters. So, the volume of hydrogen gas, produced every second is 22.4*0.62·10-5 liter, which is 13.9·10-5 liter, which is 0.139 ml.
The temperature of the water in the tank only was approximately 10 şC and the air above was even colder (cold weather, frosty evening), so the volume of gas must be corrected for that. Assuming 10 şC, which is 283 Kelvin: 0.139 * 283/300 = 0.131. So, according to math, just over 0.13 ml of hydrogen gas is produced every second.
The test tubes have a volume of 22 ml. When 0.131 ml of gas is produced every second, then it takes 22/0.131 = 168 seconds before the tube is full.
This computational result is fairly close to the time, estimated from the video. If one is watching the video and sees how much gas is collected in the 78 seconds of video time, then one comes to a rough estimate of 3 minutes for a full test tube. This is fairly close to the number, computed above.