

Spontaneous combustion of phosphine
Phosphine is a highly flammable gas, which easily can be ignited. In air it does not self-ignite, but in chlorine gas it does self-ignite, giving an orange flame, and a popping noise.
In this experiment, first some phosphine is made, and after that, the gas is bubbled into chlorine gas.
![]() Preparation of phosphine is a fairly dangerous process, due to self-igniting
impurities in the phosphine and due to the high toxicity of the phosphine. The
preparation must be done in a completely closed system and no air may be allowed
to enter the apparatus. The preparation also involves boiling hot solutions of
sodium hydroxide, which are extremely corrosive to human tissue and handling
molten white phosphorus. Carefully follow the guidelines, given below. Do not
use larger quantities as stated below!
Preparation of phosphine is a fairly dangerous process, due to self-igniting
impurities in the phosphine and due to the high toxicity of the phosphine. The
preparation must be done in a completely closed system and no air may be allowed
to enter the apparatus. The preparation also involves boiling hot solutions of
sodium hydroxide, which are extremely corrosive to human tissue and handling
molten white phosphorus. Carefully follow the guidelines, given below. Do not
use larger quantities as stated below!
![]()
![]() Required
chemicals:
Required
chemicals:
-
white phosphorus (can be made from red phosphorus, this is the source of my white phosphorus)
-
sodium hydroxide
-
hydrochloric acid
-
calcium hypochlorite (or any other chemical, suitable for making chlorine in decent amounts)
-
butane gas or "dust-off", from a canister which can be used to blow dust away from cameras, laptops and so on. This is not used as part of the reaction, but it is used as inert gas.
-
household bleach for cleanup after the preparation of the phosphine.
![]() Required
equipment:
Required
equipment:
-
syringe with flexible plastic tube
-
small test tube, with a one-hole stopper to which a flexible piece of PVC tube can be connected
-
small heater (alcohol lamp is suitable)
-
clamps
-
glass tank, but a plastic tub also is suitable
![]() Safety:
Safety:
-
The preparation of the phosphine gas is dangerous, if not carried out precisely as described in the procedure below. Careless working may lead to fire and/or severe poisoning.
-
 White phosphorus is extremely toxic and extremely
flammable. Never handle this with your hands, always use a pair of tweezers
to handle pieces of white phosphorus, and if pieces of the chemical must be
cut in smaller parts, always do this under cold water!
White phosphorus is extremely toxic and extremely
flammable. Never handle this with your hands, always use a pair of tweezers
to handle pieces of white phosphorus, and if pieces of the chemical must be
cut in smaller parts, always do this under cold water! -
Sodium hydroxide is very corrosive, especially for the eyes. Use adequete eye-protection when handling solutions of sodium hydroxide.
-
Hydrochloric acid is corrosive and emits noxious fumes at higher concentrations.
-
Calcium hypochlorite is corrosive and is a strong oxidizer.
-
Phosphine, produced in this experiment, is an exceptionally toxic gas.
-
The phosphine,
produced in this experiment is not 100% pure, it also contains some P2H4,
which makes the gas self-igniting when in contact with air. The apparatus,
in which the phosphine is prepared, must be setup as described below,
otherwise there will be a serious risk of fire and/or explosion!
-
Chlorine gas, produced in this experiment, is very toxic and corrosive. Fortunately, it has excellent warning properties, but nevertheless, be careful not to inhale too much chlorine gas.
- Do not scale up the experiment, only use quantities, as shown here. With these small quantities, the experiment can be done in a safe way.
![]() Disposal:
Disposal:
-
A special section of this webpage is devoted to the cleanup, follow the instructions given there.
![]()

Making some phosphine
![]() Prepare
a solution of sodium hydroxide in a small test tube. Take approximately 1 gram
of sodium hydroxide and mix with 2 ml of water. Be careful, quite some heat is
evolved, while the sodium hydroxide dissolves. Use adequate eye protection,
splashes of this caustic solution are extremely damaging to the eye.
Prepare
a solution of sodium hydroxide in a small test tube. Take approximately 1 gram
of sodium hydroxide and mix with 2 ml of water. Be careful, quite some heat is
evolved, while the sodium hydroxide dissolves. Use adequate eye protection,
splashes of this caustic solution are extremely damaging to the eye.
![]() Let the
solution of sodium hydroxide cool down and then add a
piece of white phosphorus, not larger than a pea.
Let the
solution of sodium hydroxide cool down and then add a
piece of white phosphorus, not larger than a pea.
![]() Prepare a rubber stopper with a flexible PVC tube and keep
the remote end under water.
Prepare a rubber stopper with a flexible PVC tube and keep
the remote end under water.
![]() In the
test tube, with the solution of sodium hydroxide and the small piece of
phosphorus, spray some "dust-off", or some butane from a cigarette
lighter refill canister. Try to get some liquid gas in the test tube as well. Immediately
firmly push the prepared rubber stopper in the test tube, while the PVC tube is
in the stopper and the remote end is under water. As the liquid butane
or "dust-off" evaporates, it drives out all air from the test tube and the thin
PVC tube. Bubbles of gas appear on the remote end, which is under water. Just
let this gas escape, no need to collect it.
In the
test tube, with the solution of sodium hydroxide and the small piece of
phosphorus, spray some "dust-off", or some butane from a cigarette
lighter refill canister. Try to get some liquid gas in the test tube as well. Immediately
firmly push the prepared rubber stopper in the test tube, while the PVC tube is
in the stopper and the remote end is under water. As the liquid butane
or "dust-off" evaporates, it drives out all air from the test tube and the thin
PVC tube. Bubbles of gas appear on the remote end, which is under water. Just
let this gas escape, no need to collect it.
When using butane gas or a flammable brand of "dust-off" be careful not to have any open fire nearby. When all gas has evaporated and bubbles of gas do not appear at the remote end of the flexible PVC tube anymore, then wait a few minutes, before the next step is performed. In that time, the flammable gas will have disappeared and/or will be diluted so much that there is no risk of fire anymore.
The next step must be done in a fume hood, or outside. A small quantity of toxic phosphine will be released into the air.
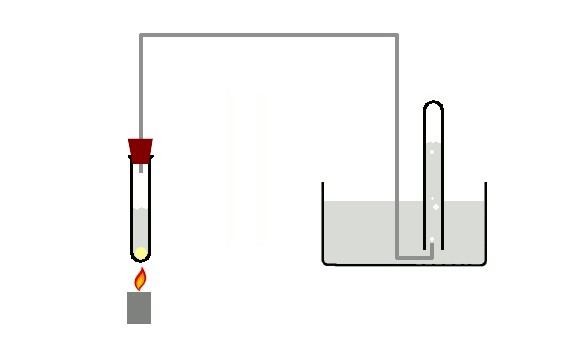
![]() Carefully heat the test tube, while keeping the remote end of
the PVC tube under water and keeping it tightly stoppered. Heat until the liquid
is near boiling. When this is done, then the phosphorus melts and bubbles of gas
are produced. Collect the gas in an inverted test tube under water. Initially,
the gas will be mostly butane or "dust-off" gas. Keep on collecting gas, until
the volume of collected gas is at least 4 times the volume of gas-mix above the
liquid in the small test tube. At this point, one can assume that most of the
butane or "dust-off" gas has been driven off and is replaced by phosphine. All
gas, which is collected in this first phase may be considered waste gas. Set it
aside, it can be used for some experiments, but it is very impure phosphine. If
one decides not to use this for experiments, then store the gas for at least one
day, before releasing it into the air, or release the gas slowly, bubble after
bubble. Do not simply release all of this waste gas into the air at once,
immediately after its preparation. There may be sufficient P2H4
contamination to make it self-igniting when it comes in contact with air!
After a day of storage, there is no risk of self-ignition anymore and then the
gas simply can be released into the air to get rid of it (do this outside or in
a fume hood).
Carefully heat the test tube, while keeping the remote end of
the PVC tube under water and keeping it tightly stoppered. Heat until the liquid
is near boiling. When this is done, then the phosphorus melts and bubbles of gas
are produced. Collect the gas in an inverted test tube under water. Initially,
the gas will be mostly butane or "dust-off" gas. Keep on collecting gas, until
the volume of collected gas is at least 4 times the volume of gas-mix above the
liquid in the small test tube. At this point, one can assume that most of the
butane or "dust-off" gas has been driven off and is replaced by phosphine. All
gas, which is collected in this first phase may be considered waste gas. Set it
aside, it can be used for some experiments, but it is very impure phosphine. If
one decides not to use this for experiments, then store the gas for at least one
day, before releasing it into the air, or release the gas slowly, bubble after
bubble. Do not simply release all of this waste gas into the air at once,
immediately after its preparation. There may be sufficient P2H4
contamination to make it self-igniting when it comes in contact with air!
After a day of storage, there is no risk of self-ignition anymore and then the
gas simply can be released into the air to get rid of it (do this outside or in
a fume hood).
It is very important that no air can get into the hot test tube with the phosphine gas. If this happens, then there will be instant fire and there even is a risk of explosion.
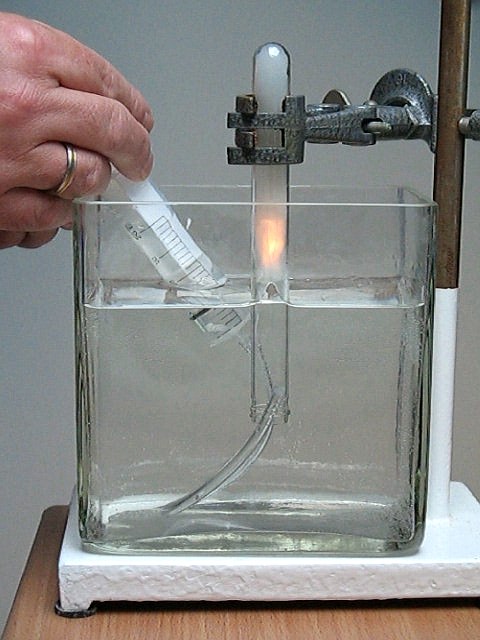
![]() Now, start collecting bubbles of the gas under water in an
inverted test tube. These bubbles of gas are almost 100% pure phosphine. Keep on
heating, as long as there still is some phosphorus left, no phosphorus may
remain behind, due to the risk of fire during cleanup after this experiment. The
temperature of the liquid should be
just below the boiling point of water. When all phosphorus is used up, then stop
heating. Use the setup, as shown in the picture below. Swirl the test tube with
the blob of white phosphorus in it, just to be sure that the liquid does not
bump excessively. For this reason one should use flexible tubing in the stopper.
Now, start collecting bubbles of the gas under water in an
inverted test tube. These bubbles of gas are almost 100% pure phosphine. Keep on
heating, as long as there still is some phosphorus left, no phosphorus may
remain behind, due to the risk of fire during cleanup after this experiment. The
temperature of the liquid should be
just below the boiling point of water. When all phosphorus is used up, then stop
heating. Use the setup, as shown in the picture below. Swirl the test tube with
the blob of white phosphorus in it, just to be sure that the liquid does not
bump excessively. For this reason one should use flexible tubing in the stopper.
When no more phosphorus remains, then one also can use the gas mix above the sodium hydroxide. One can bubble that gas into a clean test tube as well under water, giving another test tube with some phosphine.
Bubbles of the gas mix from the heated test tube certainly ignite when they come in contact with air. This is due to the presence of a contamination of the phosphine. This contamination mainly is P2H4, which self-ignites in contact with air. The gas, collected in an inverted test tube through a long piece of thin PVC tubing usually does not self-ignite in air. The P2H4 does not make it into the inverted test tube, it sticks to the inner wall of the PVC tube and decomposes.
Storing the phosphine in inverted stoppered test tubes, under water
Phosphine hardly is soluble in water (0.22 ml of gas in 1 ml of water at room temperature and standard pressure), so one can easily keep the phosphine in inverted test tubes, with the open end stoppered, and immersed in water, upside down.
A remarkable observation was made. After a day of storage, the gas, which was collected through the thin PVC tube and bubbled in an inverted test tube, still was clean and colorless. The gas, taken directly from the test tube with the solution of sodium hydroxide, partly decomposed. After one day, the volume of that amount of gas is slightly less (but only very slightly), and the glass wall is covered by a thin yellow layer.
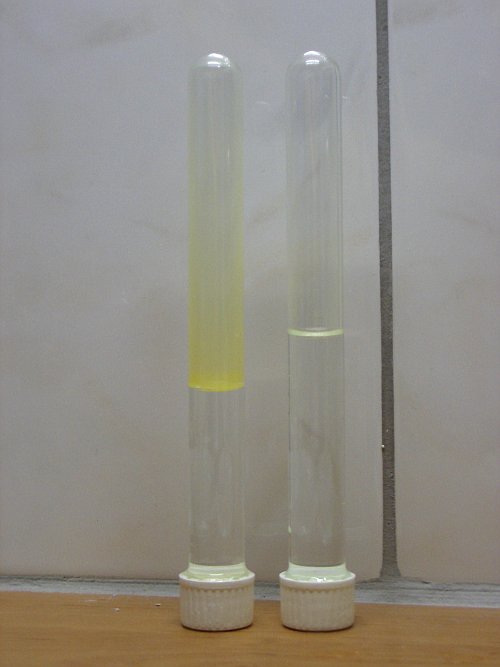
The yellow compound is a decomposition/polymerization product of the P2H4, which still was in the gas, taken directly from the heated test tube. After a day of storage, a bubble of gas, taken from the left test tube with the yellow solid, does not self-ignite in air anymore. This is another indication that the P2H4 decomposed and is not present anymore in the gas phase. So, after a day, there are two test tubes with reasonably pure phosphine.
![]()
Bubbling the phosphine in chlorine gas
A really neat demonstration is when phosphine is bubbled into a test tube, filled with chlorine gas. The reaction between phosphine and chlorine is explosively violent. As soon as the two gasses meet each other, an explosion occurs and a flash of orange light is emitted. This can be demonstrated in a safe way, on a small scale, by bubbling little bubbles of phosphine in an inverted test tube, filled with chlorine. Performing this experiment can be done as outlined below.
![]() Take a
small syringe (20 ml) and suck out the phosphine from one of the test tubes,
assuring that no air is mixed in. If a flexible tube is attached to the tip of
the syringe, then also assure that this is full of water, before any phosphine
is sucked out of the test tube. Close the end of the flexible test tube, and
then transfer the syringe with attached tube to a water tank and keep all of
this under water. Once under water, the end of the tube may be opened up again.
Take a
small syringe (20 ml) and suck out the phosphine from one of the test tubes,
assuring that no air is mixed in. If a flexible tube is attached to the tip of
the syringe, then also assure that this is full of water, before any phosphine
is sucked out of the test tube. Close the end of the flexible test tube, and
then transfer the syringe with attached tube to a water tank and keep all of
this under water. Once under water, the end of the tube may be opened up again.
![]() Take
another test tube and prepare some chlorine gas in this (do this in a fume hood,
or outside) by adding a spatula full of calcium hypochlorite to a few ml of 10%
hydrochloric acid. Let the gas develop and drive off air from the test tube and
at the moment, when production of chlorine almost ceases, then stopper the test
tube and immediately keep it inverted under water. Then release the stopper
again. Bubble the chlorine gas into another clean test tube. Use warm water (but
not so hot that your hands cannot stand the heat of the water), otherwise too
much of the chlorine is dissolved by the water. If too much does dissolve, then
make another portion of chlorine and bubble this in the test tube as well.
Take
another test tube and prepare some chlorine gas in this (do this in a fume hood,
or outside) by adding a spatula full of calcium hypochlorite to a few ml of 10%
hydrochloric acid. Let the gas develop and drive off air from the test tube and
at the moment, when production of chlorine almost ceases, then stopper the test
tube and immediately keep it inverted under water. Then release the stopper
again. Bubble the chlorine gas into another clean test tube. Use warm water (but
not so hot that your hands cannot stand the heat of the water), otherwise too
much of the chlorine is dissolved by the water. If too much does dissolve, then
make another portion of chlorine and bubble this in the test tube as well.
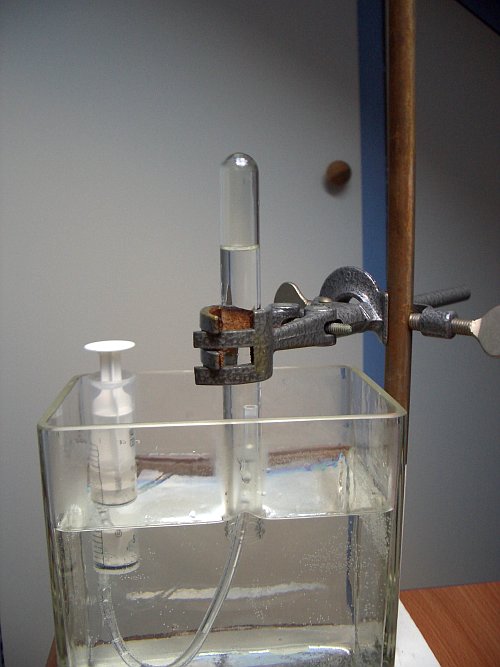
![]() Stopper
the clean test tube with chlorine gas again and transfer this to the tank with
water as well and mount it in a clamp, upside down, such that its open end is
well below the surface of the water.
Stopper
the clean test tube with chlorine gas again and transfer this to the tank with
water as well and mount it in a clamp, upside down, such that its open end is
well below the surface of the water.
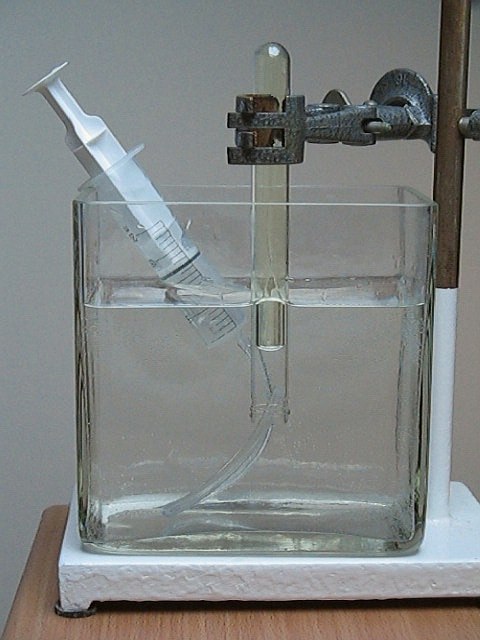
![]() Insert
the end of the flexible PVC tube, which is attached to the syringe into the open
end of the test tube with chlorine gas. Be sure that no bubbles of phosphine are
pressed into the gas already, it is best to pull the plunger of the syringe a
little further, so that the end of the thin PVC tube is filled with water.
Insert
the end of the flexible PVC tube, which is attached to the syringe into the open
end of the test tube with chlorine gas. Be sure that no bubbles of phosphine are
pressed into the gas already, it is best to pull the plunger of the syringe a
little further, so that the end of the thin PVC tube is filled with water.
After these steps, the following setup is obtained:
When the plunger of the syringe is pressed, then bubbles of phosphine are mixed with the chlorine, and this is accompanied with flashes and little explosions. The volume of gas in the test tube also decreases when phosphine is pressed into the test tube.
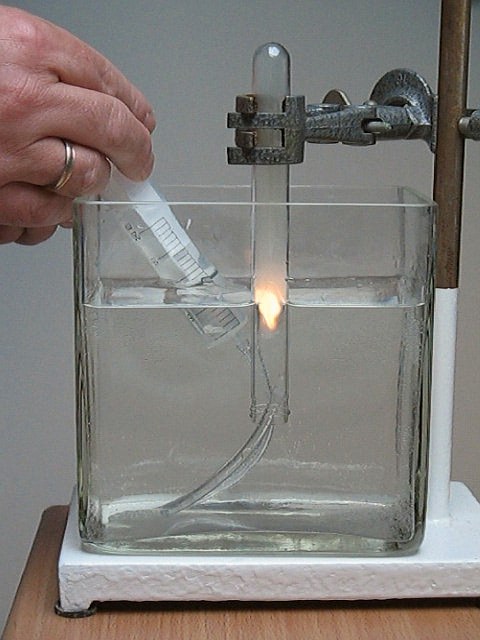
The test tube is filled with a white fume/smoke, and the color of the chlorine gas becomes harder to observe. At the end of the experiment, a small amount of gas remained (there was not sufficient phosphine in the syringe to use all of the chlorine gas). The chlorine gas also probably was not 100% pure, but only 90% or so, because the remaining gas is almost colorless, it only has a very faint green color. After the experiment, the situation is as follows:
A video of this reaction is available for download: flashing.avi. Download size is approximately 6 MByte. The flashing is remarkable, but another striking feature of the video is that it demonstrates that the amount of gas in the test tube decreases, despite the fact that lots of gas are added to it!
![]()
Cleanup
Cleanup after this experiment requires extra care. The test tube, in which the phosphorus and sodium hydroxide are heated will be covered with a thin layer of phosphorus and decomposition products of P2H4.
The solution of sodium hydroxide contains hypophosphite after all phosphorus has dissolved. This solution can be diluted with a lot of water and flushed down the drain with a lot of water.
A cleaning solution must be prepared by adding a few ml of household bleach to a 10 ml of 10% hydrochloric acid. This produces a solution of chlorine in the acid. This is a chlorine-based acidic cleaning solution, which destroys remains of phosphorus at once. With this solution, the test tube must be rinsed. Next, suck this cleaning liquid into a syringe through the thin PVC tube. This cleans the inside of the PVC tube. Immediately after this, suck a lot of clean water through the PVC tube. The chlorine-based cleaning solution should not be too long in contact with the PVC tube, otherwise it attacks the PVC and the tube becomes turbid and brittle. The rubber stopper also must be rinsed with the chlorine-based cleaning solution. After use, the cleaning solution may be flushed down the drain with a lot of water.
![]()
Discussion of results
![]() When white phosphorus is added to a hot solution, containing hydroxide at high
concentration, then the element disproportionates to mainly hypophosphite and phosphine.
When white phosphorus is added to a hot solution, containing hydroxide at high
concentration, then the element disproportionates to mainly hypophosphite and phosphine.
P4 + 3OH– + 3H2O → PH3 + 3H2PO2–
There also is a side reaction, and that side reaction makes the produced gas self-igniting when it comes in contact with air.
3P4 + 8OH– + 8H2O → 2P2H4 + 8H2PO2–
There is another side reaction, in which some phosphite ion, HPO32-, is formed as well besides the hypophosphite. This side reaction does not affect the composition of the produced gas mix.
![]() After a certain period of storage, the P2H4
has disappeared and the remaining gas is not self-igniting in air anymore.
The P2H4 is converted to a yellow/brown solid, which
settles at the glass walls.
After a certain period of storage, the P2H4
has disappeared and the remaining gas is not self-igniting in air anymore.
The P2H4 is converted to a yellow/brown solid, which
settles at the glass walls.
![]() Phosphine reacts violently with chlorine gas. The following reaction occurs:
Phosphine reacts violently with chlorine gas. The following reaction occurs:
PH3 + 3Cl2 → PCl3 + 3HCl + a lot of energy (heat and light)
Most likely, also some PCl5 is formed as well in the excess chlorine. HCl dissolves in water, and the PCl3 also reacts with water, giving more HCl and H3PO3. The white fume/smoke is due to the formation of HCl and PCl3. Because all reaction products are water-soluble, it also can be explained why the volume of gas decreases, despite the fact that more gas is added.
Remark: When this experiment is used as a demonstration for a group of people, then one can prepare the phosphine in advance, even a few days before the actual demonstration. Phosphine can be stored for days or even weeks in an inverted test tube, or an inverted bottle, with the open end under water and tightly stoppered.