


Reactions of metallic niobium
Niobium is a very inert metal. Despite its inherent reactivity, it is so inert, due to formation of a really thick and inert oxide layer. This is nicely demonstrated by this electrolysis experiment and by the action of extreme acid solvents on the metal and the oxide.
![]() In this experiment some hydrofluoric acid is formed, which is very toxic.
Be sure that no fumes are inhaled, not even the tiniest amounts.
In this experiment some hydrofluoric acid is formed, which is very toxic.
Be sure that no fumes are inhaled, not even the tiniest amounts.
![]()
![]() Required
chemicals:
Required
chemicals:
-
niobium metal in the bulk state
-
nitric acid
-
hydrochloric acid
-
sodium fluoride
-
sodium hydroxide
![]() Required
equipment:
Required
equipment:
-
voltage source, adjustable up to 30 V.
- graphite rod (optionally, copper wire also works, but it may introduce a small amount of copper contamination in the liquid).
![]() Safety:
Safety:
- Nitric acid is corrosive, especially at concentrations above around 40%. It destroys the skin, when it is allowed to remain on it for more than a few seconds. If some is spilled on the skin, immediately rinse with a lot of water. Concentrated nitric acid leaves yellow stains on the skin, which, however, will disappear within some days.
- Hydrochloric acid is corrosive. In this experiment only 10% HCl is used, and at that concentration it does not emit fumes.
- Sodium fluoride is toxic and corrosive.
-
 Once sodium
fluoride is added to nitric acid or hydrochloric acid, hydrogen fluoride is
formed, which easily escapes from the liquid. This is exceedingly toxic
and one should not conduct this experiment if one cannot be sure that no
hydrofluoric acid fumes are breathed.
Once sodium
fluoride is added to nitric acid or hydrochloric acid, hydrogen fluoride is
formed, which easily escapes from the liquid. This is exceedingly toxic
and one should not conduct this experiment if one cannot be sure that no
hydrofluoric acid fumes are breathed. - At a voltage of 30 V, when a powerful (low internal resistance) voltage source is used, a shortcut can be quite nasty.
![]() Disposal:
Disposal:
- The amount of metallic waste, formed in this experiment is negligibly small. All waste can be diluted with a lot of water and then flushed down the drain, with a lot of water rinsed afterwards. This is of no concern, because every day much more fluoride is released in the environment from toothpastes.
![]()
Electrolysis of niobium metal
![]() Take
some dilute hydrochloric acid, containing approximately 10% HCl.
Take
some dilute hydrochloric acid, containing approximately 10% HCl.
![]() Turn
down the power supply to a low voltage (less than 3 volts). Connect a graphite
rod (or a copper wire if no graphite rod is available) to the negative pole of
the power supply, this is the cathode. Connect the piece of niobium metal to the
positive pole of the power supply, this is the anode.
Turn
down the power supply to a low voltage (less than 3 volts). Connect a graphite
rod (or a copper wire if no graphite rod is available) to the negative pole of
the power supply, this is the cathode. Connect the piece of niobium metal to the
positive pole of the power supply, this is the anode.
![]() Immerse
both the cathode and the niobium anode in the dilute hydrochloric acid. Assure
that at the anode only the niobium metal is immersed in the liquid and not the
clamp and the copper wire, which is connected to the niobium metal.
Immerse
both the cathode and the niobium anode in the dilute hydrochloric acid. Assure
that at the anode only the niobium metal is immersed in the liquid and not the
clamp and the copper wire, which is connected to the niobium metal.
![]() Turn up the voltage to approximately 4 volts. This causes
some hydrogen gas to be formed at the cathode. No gas is formed at the anode.
The formation of hydrogen gas, however, quickly stops.
Turn up the voltage to approximately 4 volts. This causes
some hydrogen gas to be formed at the cathode. No gas is formed at the anode.
The formation of hydrogen gas, however, quickly stops.
![]() Increase the applied voltage. Again some hydrogen gas is
formed at the cathode, but also in this case the reaction stops within a few
seconds.
Increase the applied voltage. Again some hydrogen gas is
formed at the cathode, but also in this case the reaction stops within a few
seconds.
![]() Increase the applied voltage to 30 V. This is a very
high voltage for electrolysis experiments. Again some hydrogen gas is formed at
the cathode and also again the reaction stops within a few seconds. At this
point, a really stunning observation can be made. The part of the anode,
immersed in the liquid, is covered by a beautiful blue layer, which is
remarkably inert.
Increase the applied voltage to 30 V. This is a very
high voltage for electrolysis experiments. Again some hydrogen gas is formed at
the cathode and also again the reaction stops within a few seconds. At this
point, a really stunning observation can be made. The part of the anode,
immersed in the liquid, is covered by a beautiful blue layer, which is
remarkably inert.
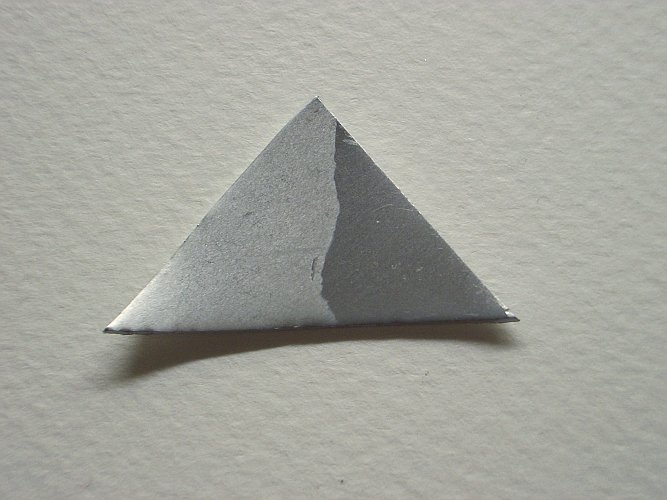
The two pictures below show the piece of niobium metal after the electrolysis at 30 V. Click on the pictures for a larger image. The piece of niobium has a weight of approximately 2.7 grams and the length of the longest edge is almost 3.5 cm.
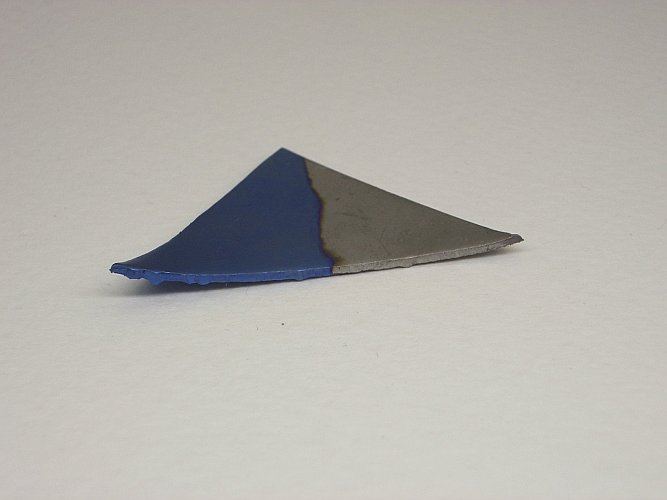
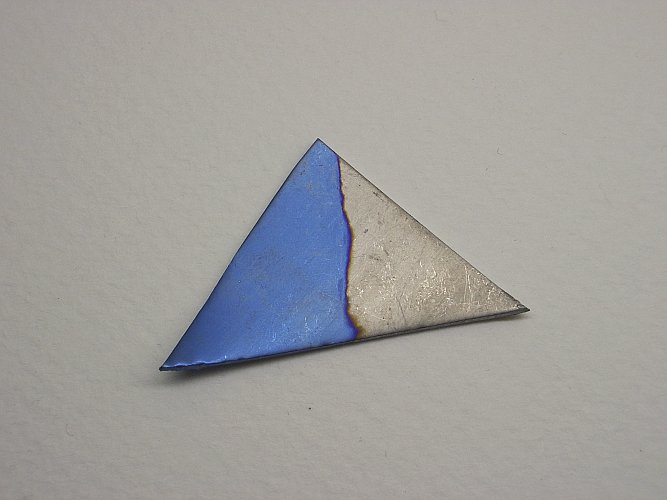
The blue compound most likely is due to an oxide layer, which is formed under the strongly oxidizing conditions during the electrolysis experiment.
The blue compound is not easily wiped off. Only by severe mechanical means, the blue layer can be scraped off. Nitric acid and hydrochloric acid do not attack the blue layer.
![]()
Dissolving some of the metal and the blue layer
This blue layer is remarkably inert. Even concentrated hydrochloric acid does not affect this layer. However, a warm mix of hydrofluoric acid and nitric acid at high concentration is capable of slowly dissolving the blue layer.
![]() Take a few ml of approximately 50% nitric acid and add a
spatula full of solid sodium fluoride. Heat a little by immersing this in a
water bath of 60 C. Use a plastic vial for this experiment. A glass test tube is
ruined quickly under these conditions, due to formation of hydrofluoric acid. If
not all sodium fluoride dissolves, then add a small amount of hot distilled
water, dropwise while swirling, until all sodium fluoride has dissolved. This
part of the experiment MUST be done outside on a sufficiently windy day, or in a
good fume hood. Otherwise, this experiment should not be performed. Also be
absolutely sure that nothing of the liquid touches your skin. The
warm/hot liquid emits fumes, which contain quite some HF. Also small amounts of
NO2 are formed (brown gas above the liquid).
Take a few ml of approximately 50% nitric acid and add a
spatula full of solid sodium fluoride. Heat a little by immersing this in a
water bath of 60 C. Use a plastic vial for this experiment. A glass test tube is
ruined quickly under these conditions, due to formation of hydrofluoric acid. If
not all sodium fluoride dissolves, then add a small amount of hot distilled
water, dropwise while swirling, until all sodium fluoride has dissolved. This
part of the experiment MUST be done outside on a sufficiently windy day, or in a
good fume hood. Otherwise, this experiment should not be performed. Also be
absolutely sure that nothing of the liquid touches your skin. The
warm/hot liquid emits fumes, which contain quite some HF. Also small amounts of
NO2 are formed (brown gas above the liquid).
![]() Immerse the piece of niobium metal in the nitric
acid/hydrofluoric acid mixture, such that both the blue part and the metallic
part become covered by the acid mix.
Immerse the piece of niobium metal in the nitric
acid/hydrofluoric acid mixture, such that both the blue part and the metallic
part become covered by the acid mix.
![]() Occasionally swirl and keep the liquid warm. A small amount
of nitrous fumes is formed here, the air above the liquid becomes light brown,
especially if the liquid is swirled. The air above the liquid also will contain
hydrogen fluoride, but this cannot be seen. Be careful not to breathe any of
the fumes.
Occasionally swirl and keep the liquid warm. A small amount
of nitrous fumes is formed here, the air above the liquid becomes light brown,
especially if the liquid is swirled. The air above the liquid also will contain
hydrogen fluoride, but this cannot be seen. Be careful not to breathe any of
the fumes.
![]() Slowly, in the course of several minutes, the blue layer
disappears. It becomes thinner and the metallic color becomes visible again.
After approximately 10 minutes no blue color can be observed anymore. At this
point, dilute the liquid with some distilled water, approximately three times.
Keep the liquid for further experiments and take out the piece of niobium metal
with a pair of plastic tweezers. Rinse the piece of niobium metal
thoroughly with tap water before it is taken in the hands.
Slowly, in the course of several minutes, the blue layer
disappears. It becomes thinner and the metallic color becomes visible again.
After approximately 10 minutes no blue color can be observed anymore. At this
point, dilute the liquid with some distilled water, approximately three times.
Keep the liquid for further experiments and take out the piece of niobium metal
with a pair of plastic tweezers. Rinse the piece of niobium metal
thoroughly with tap water before it is taken in the hands.
The three pictures below show the piece of niobium after treatment with the acid mix. Click one of the pictures for a larger image. These pictures show that the right part of the piece of niobium (which was not covered with the blue layer) has become very shiny, the left part has obtained a more matte surface, which in fact looks very attractive. Especially the rightmost picture shows nice details. It was made with light falling on the metal under a very small angle.
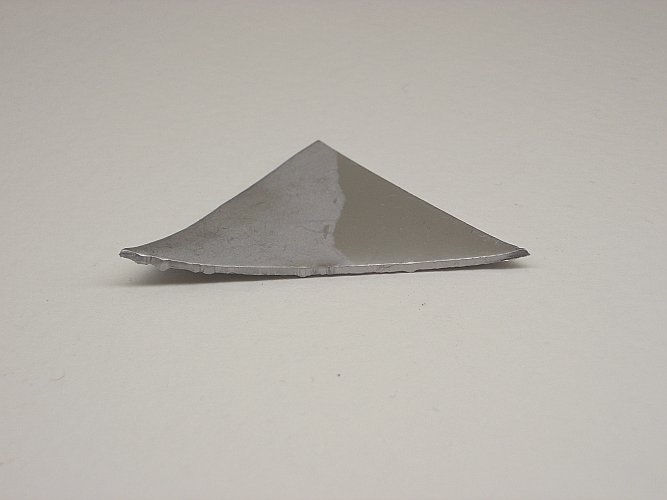
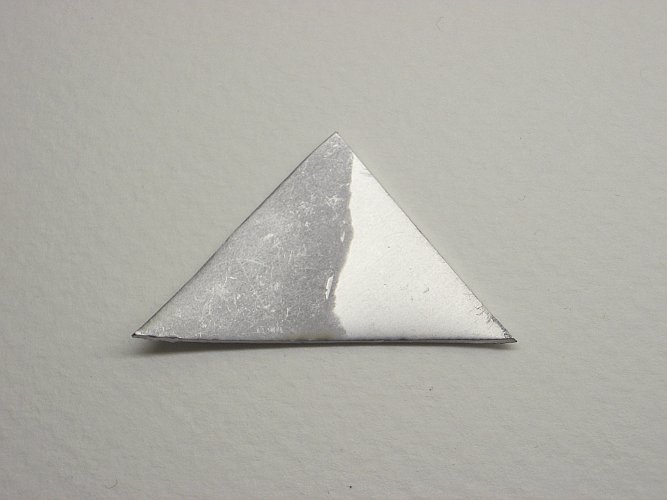
The treatment with the acid mix has made the right part of the metal more shiny, apparently some scratched oxide has dissolved and a new thin layer is formed, on top of a very smooth metallic surface.
![]()
Properties of dissolved niobium
For this part of the experiment, the liquid, obtained in the previous experiment is used. This liquid is colorless.
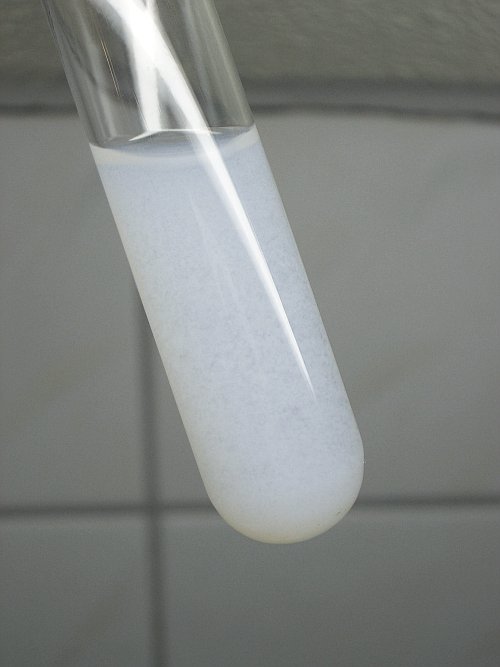
![]() Take half the amount of liquid and slowly add a moderately
concentrated solution of sodium hydroxide, drop by drop and swirl the liquid
after each drop. At a certain point, the liquid becomes turbid and a flocculent
white precipitate is formed. When this point is reached add one or two more
drops of solution of sodium hydroxide and then stop. A picture of the white
precipitate is shown in the picture at the left. When the picture is clicked, a
larger and more detailed image is given.
Take half the amount of liquid and slowly add a moderately
concentrated solution of sodium hydroxide, drop by drop and swirl the liquid
after each drop. At a certain point, the liquid becomes turbid and a flocculent
white precipitate is formed. When this point is reached add one or two more
drops of solution of sodium hydroxide and then stop. A picture of the white
precipitate is shown in the picture at the left. When the picture is clicked, a
larger and more detailed image is given.
![]() Add more
solid NaOH to the liquid. This solid NaOH dissolves, but the white precipitate
does not dissolve, not even if a large amount of NaOH is dissolved.
Add more
solid NaOH to the liquid. This solid NaOH dissolves, but the white precipitate
does not dissolve, not even if a large amount of NaOH is dissolved.
![]() Take the other half of the liquid and add some dilute
hydrochloric acid to this. This causes all of the white precipitate to dissolve
again. The liquid becomes colorless again.
Take the other half of the liquid and add some dilute
hydrochloric acid to this. This causes all of the white precipitate to dissolve
again. The liquid becomes colorless again.
![]()
Electrolysis with another solvent and at different voltages
The same piece of niobium is used in an electrolysis experiment again, but now with dilute nitric acid as electrolyte. Lab grade nitric acid was used at a concentration of 2 M.
From this experiment it can be concluded that the electrolyte does not determine the color obtained. The voltage, however, has a strong influence on the final color. In this experiment, the piece of niobium metal first is immersed partly in the dilute nitric acid and a voltage of almost 30 V is applied. Within a second, the metal turns blue and the flow of current ceases.
Next, the other part of the niobium is immersed in the nitric acid, but now a voltage of 13.5 V is applied. This results in a bronze/brown coloration of the free metal. The part which was blue already remains blue. The picture below shows the piece of niobium, together with a fresh untreated piece of niobium.
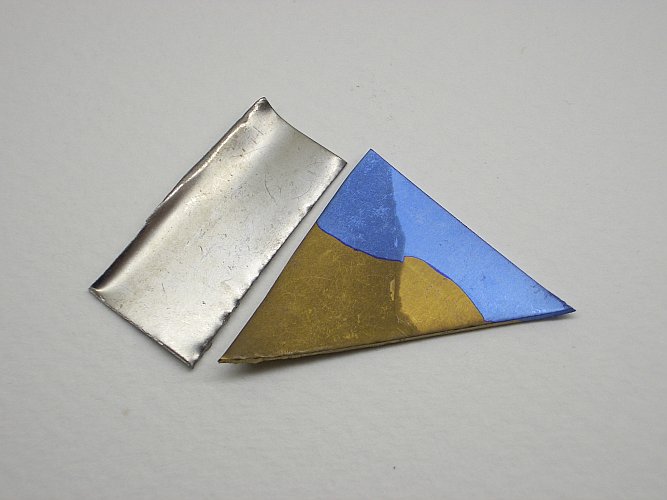
One can clearly see the matte surface of the previous electrolysis experiment. This matte surface also becomes colored again. The blue part is due to a voltage of 30 V and the bronze part is due to a voltage of 13.5 V.
Lateron, when the bronze part is immersed in the electrolyte again, and a voltage of 30 V is applied, it also becomes blue. So, changing a low-voltage color to a higher-voltage color can be done by simply applying a higher voltage. A higher-voltage color, however, cannot be transformed to a lower voltage color.
![]()
Discussion of results
The electrolysis experiment is really stunning. The final color of the metal depends on the maximum value of the applied voltage. The precise nature of the electrolyte apparently has no (or much less) influence. Both dilute nitric acid and dilute hydrochloric acid give a blue coloration at 30 V.
The colors are due to formation of a transparent oxide layer at the anode. The thickness of the oxide layer depends on the applied voltage. The higher the voltage, the thicker the oxide layer. A combination of reflected light from the oxide surface and reflected light from the metal surface gives rise to all kinds of observed colors.
A nice description of the effect is given at the following website: http://pubs.acs.org/cen/80th/niobium.html
According to literature (Chemistry of the Elements by Greenwood and Earnshaw), the oxide dissolves in hydrofluoric acid, forming colorless NbOF4– ions. When hydroxide is added, this forms insoluble Nb2O5. According to this book, the Nb2O5 is exceedingly inert and hardly dissolves in excess alkali. Only at very high concentration and with a lot of heating it slowly dissolves. The reason that this dissolves again, when some hydrochloric acid is added most likely is that quite some fluoride is present in the solutions and the oxofluoro complex NbOF4– is formed again. More research must be done on this, by isolating the flocculent precipitate.