

Concentration and purification of household ammonia
This webpage describes how one can concentrate household ammonia. Common household ammonia has a concentration of 5% NH3 by weight. The household ammonia also may contain other unwanted impurities, such as dissolved salts. Even the clear and colorless household ammonia as is common in many countries may contain quite some impurities which only become visible when one is evaporating the liquid.
Here, a procedure is presented, which allows concentrating and at the same time purifying the household ammonia. Using this procedure, 125 ml of impure household ammonia is converted to 40 ml of very pure ammonia, which has a concentration of well over two times the concentration of the household ammonia.
![]()
![]() Required
chemicals:
Required
chemicals:
-
household ammonia
-
distilled water
![]() Required
equipment:
Required
equipment:
-
heating mantle
-
round bottom flask, preferrably with two necks
-
gas outlet, but rubber stopper will do the job as well
-
gas wash bottles (which may be as simple as a flask with a tube going to the bottom and a stopper with two holes)
![]() Safety:
Safety:
- Ammonia has a pungent odor and at high concentration it is toxic. The experiment can be conducted outside a fume hood, but in that case there should be good ventilation, such as an open window and an open door, opposite to each other.
![]() Disposal:
Disposal:
- Waste can simply be flushed down the drain.
![]()
Assembly of apparatus
The basic idea behind this experiment is that ammonia, which dissolves in water exceptionally well, becomes much less soluble at higher temperatures. Even from plain 5% ammonia, most of the dissolved gas can be driven out of the liquid, simply by heating the liquid. When this gas in turn is bubbled through distilled water, then it dissolves in water again, and a purer product is obtained. One can also keep on bubbling the gas through distilled water for a longer time, such that higher concentrations are allowed.
Although the principle behind this purification and concentration is very simple, there are some practical issues which must be resolved in order to be successful. The following setup can be used to perform the task of concentrating and purifying the ammonia.

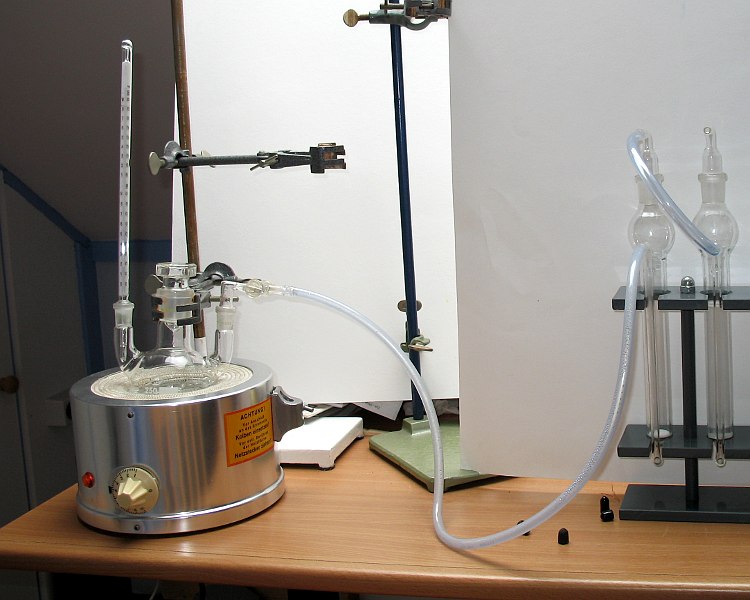
The diagram shows a heating mantle with a two-necked round-bottom flask, holding the household ammonia. A thermometer is used to measure the temperature of the vapor. A PVC tube leads the vapor to the first gas wash bottle. A second piece of PVC tube leads the vapor from the first gas wash bottle to a second gas wash bottle. The second gas wash bottle must be totally clean and initially is filled with distilled water.
In principle, only one gas wash bottle is needed, but for practical reasons an intermediate gas wash bottle is required. A practical problem with the concentration of ammonia is that not only ammonia escapes from the round-bottom flask, but also quite some water vapor. This water vapor condenses in the PVC tube and in the gas wash bottle. With the intermediate gas wash bottle, the hot water is collected in that bottle and does not get mixed with the ammonia in the second bottle. Any water, collected in the intermediate bottle will always be totally saturated with ammonia gas and the gas simply bubbles to water, which is collected in that bottle.
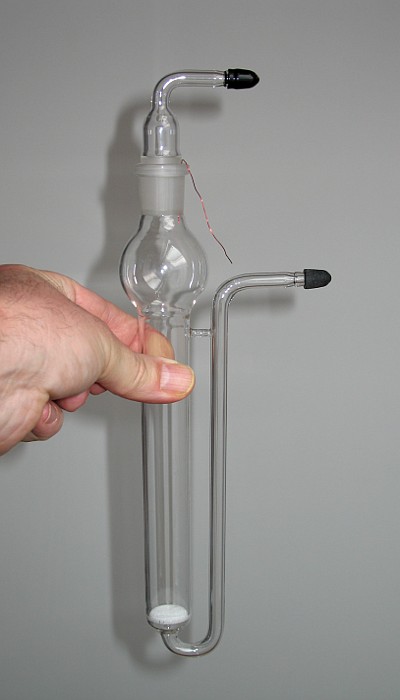
The gas wash bottles, used in this setup have a sintered glass fritte, which allows fine dispersion of the ammonia. The little red wire in the picture is just for storage of the glass wash bottles, assuring that the top can always be easily removed from the rest of the gas wash bottle. The little black rubber items are removed when the glass wash bottle is used. The gas inlet is at the lower end and the gas outlet is at the top end.
![]()
Practical setup
The practical setup of the equipment is shown in the picture below. At the left is the round bottom flask with the household ammonia and a few boiling chips. A thermometer is inserted in the round bottom flask and the PVC tube is connected to a small gas outlet which also is attached to the round-bottom flask. The picture shows a three-necked flask. This was used, because no suitable two-necked flask was available. The third neck simply is closed with a stopper.
The following picture shows the set of gas wash bottles. Only the first two are used. The right picture shows how gas is dispersed in the glass fritte and how nice small bubbles are obtained.
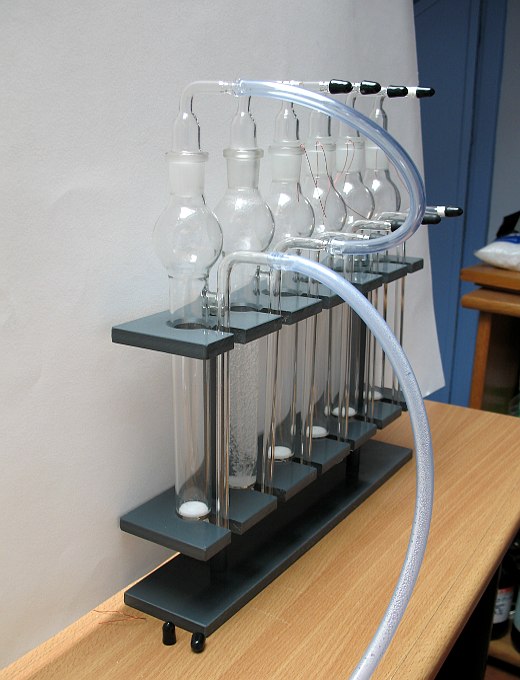

Initially, there is bubbling of gas through the distilled water, but at a certain point in time, this bubbling almost stops and there just is some hissing noise near the sintered glass fritte and very fine bubbles are produced. This occurs when the gas mix which goes from the round-bottom flask to the gas wash bottles is almost pure ammonia. Ammonia dissolves in water so well that no bubbles will make it to the surface.
The round-bottom flask was filled half-way with household ammonia, which is approximately 125 ml. The gas wash bottle was filled with a little bit more than 35 ml of distilled water.
![]()
Operating the setup
The heat of the heating mantle is adjusted, such that the liquid in the round-bottom flask just starts simmering. Do not heat too strongly, start slowly and increase heat until a convenient boiling rate is obtained. Too strong heating may result in pressure buildup and popping of stoppers and/or the thermometer!
While the ammonia is boiling off, the temperature slowly rises. Initially there will be a readout of around 80 �C, but while the concentration of ammonia in the flask decreases, the temperature readout slowly rises towards 100 �C. When the temperature readout reaches 98 ... 99 �C then one can stop heating and wait till the boiling slows down.
When heating is stopped, then it is very important to unplug the PVC tube from the second gas wash bubble, while the PVC tubes must be left connected to the intermediate gas wash bottle and the round-bottom flask.
This unplugging is important because of the risk of suck-back on cooling down of the round-bottom flask. By uncoupling the second gas wash bottle one assures that the concentrated and pure ammonia is sucked back and spoiled.
Let the setup cool down and then pour the ammonia in a clean bottle for further storage. The contents of the round-bottom flask and the intermediate gas wash bottle can be discarded.
![]()
Assessing the yield of the process
Determination of concentration, relative to the concentration of the original ammonia
Using a miniature pipette, 0.5 ml of the ammonia from the second gas wash bottle was taken and mixed with 10 ml of water. Also 0.5 ml of ammonia was taken from the bottle of household ammonia and mixed with 10 ml of water. A few drops of methyl orange indicator solution was added to both liquids. Both liquids are orange/yellow.
Next, a solution was made with dilute hydrochloric acid. This liquid was not calibrated, just diluted with a lot of water. To both samples, dilute hydrochloric acid was added, until the liquid turns red. For the purified and concentrated ammonia, 4.0 ml of acid was needed. For the original household ammonia, 1.9 ml of acid was needed.
Based on the above test, one can conclude that the concentration of the purified ammonia is slightly more than twice the concentration of the original ammonia.
Determining the yield, based on volume
The volume of the liquid in the gas wash bottle increases during the process, due to the absorption of the ammonia gas. At the end of the process approximately 40 ml of ammonia is obtained and approximately 100 ml of very dilute ammonia is left in the round-bottom flask. The following picture shows the resulting purified ammonia in a bottle and the contents of the round-bottom flask poured in a beaker.
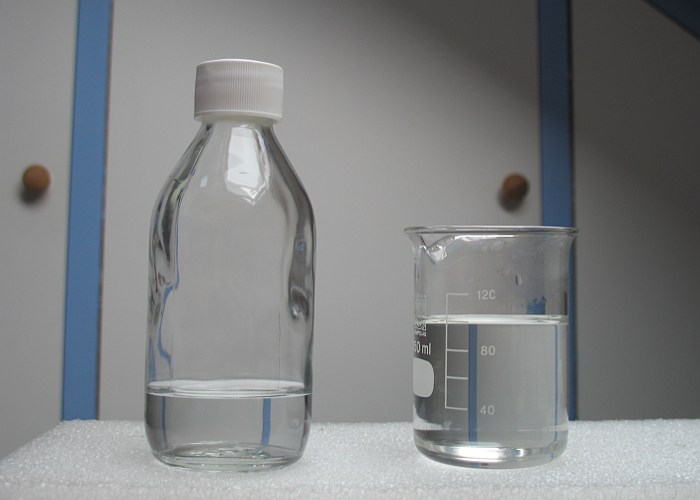
The ammonia in the beaker is so weak, that you can even stick your nose inside the beaker without getting strong irritation in the nose. The concentration of that ammonia probably is well below 1% by weight.
The main loss in the process is what is collected in the intermediate gas wash bottle. Approximately 10 ml of hot liquid is collected in that gas wash bottle. This liquid has a strong smell of ammonia, but is rather turbid. It is discarded.
So, starting from 125 ml of household ammonia, 40 ml of ammonia of well over two times the original concentration is obtained. Based on the yield and the concentration of the resulting liquid, it is estimated that approximately 70% of all ammonia is recovered.
![]()
Some final remarks
The absorption of ammonia gas in the distilled water works really well, but quite some heat is produced in this process. The inlet of the second gas wash bottle is cold and even the area below the sintered glass fritte is cold, but the liquid above the glass fritte is quite hot. The glass fritte itself is the hottest area, this is where the ammonia is absorbed by the water.
Probably the process of concentrating the ammonia can be extended much further. Even at the end, no bubbles of ammonia gas made it to the surface of the liquid in the second gas wash bottle. The concentrating process was stopped, because of the depletion of the liquid in the round-bottom flask.
In order to obtain a really pure product, it is best to do this process two times with the same gas wash bottle. The first time, some remains of other chemicals in the sintered glass fritte may dissolve in the ammonia, especially if it becomes hot. After a rinse with distilled water, the second time, the resulting ammonia will be really clean.