

Periodate salts made accessible for many home chemists
Periodate salts are very interesting salts, because they are strong oxidizers, can form many interesting complexes and they can be used in some beautiful demonstration experiments. Unfortunately, periodate salts are hard to obtain and if one can buy them, they usually are very expensive.
In this webpage, it is described how one can make sodium orthoperiodate, Na2H3IO6, from a few standard hardware store chemicals and sodium iodide (or potassium iodide) using simple glassware and some tubing only. This makes periodates much more accessible for home chemists, who cannot buy chemicals from a chemical supplier. The synthesis, proposed in this webpage is based on the following net reaction:
NaI + 9NaOH + 4Cl2 → Na2H3IO6 + 8NaCl + 3H2O
![]() In this experiment, gaseous chlorine is produced in large amounts and one must
be sure not to breathe too much of this gas. If this experiment is conducted
correctly, then the chlorine is absorbed by the liquid and hardly any gas makes
it into the air, but it is impossible to assure that no chlorine at all makes it
into the air. The chlorine generator needs to be replenished a few times during
this experiment in that procedure inevitably leads to loss of some chlorine into
the air.
In this experiment, gaseous chlorine is produced in large amounts and one must
be sure not to breathe too much of this gas. If this experiment is conducted
correctly, then the chlorine is absorbed by the liquid and hardly any gas makes
it into the air, but it is impossible to assure that no chlorine at all makes it
into the air. The chlorine generator needs to be replenished a few times during
this experiment in that procedure inevitably leads to loss of some chlorine into
the air.
![]()
![]() Required
chemicals:
Required
chemicals:
-
sodium iodide (potassium iodide can be used, but this is not preferred)
-
sodium hydroxide
-
hydrochloric acid (10...15%)
-
trichloro isocyanuric acid (TCCA swimming pool chlorine, slow release)
![]() Required
equipment:
Required
equipment:
- erlenmeyer
- heat resistant glass beaker
- one stopper with single hole
- one stopper with two holes
- a wide test tube
- thin tubes (PVC tube is suitable, but probably will have to be discarded after the experiment, bent glass tube is more durable)
- little alcohol burner
- tripod for heating a glass beaker
- clamp(s) for fixing the chlorine generator setup
![]() Safety:
Safety:
- Sodium hydroxide is very corrosive to the skin and the eyes. If it comes in contact with the skin, then rinse with water, until the slippery feeling has gone. Sodium hydroxide is extremely dangerous when it comes into the eyes! Use goggles.
- Inhalation of chlorine gas is dangerous even at low concentrations. The gas is extremely irritating and as such has good warning properties, but try to avoid excessive breathing of this gas, it may lead to pulmonary edema!
![]() Disposal:
Disposal:
- All waste, produced in this experiment, can be flushed down the drain with a lot of water. None of the chemicals is particularly toxic for the environment or is broken down quickly. Flushing through the toilet is a good option.
![]()
Preparation of alkaline sodium iodide solution
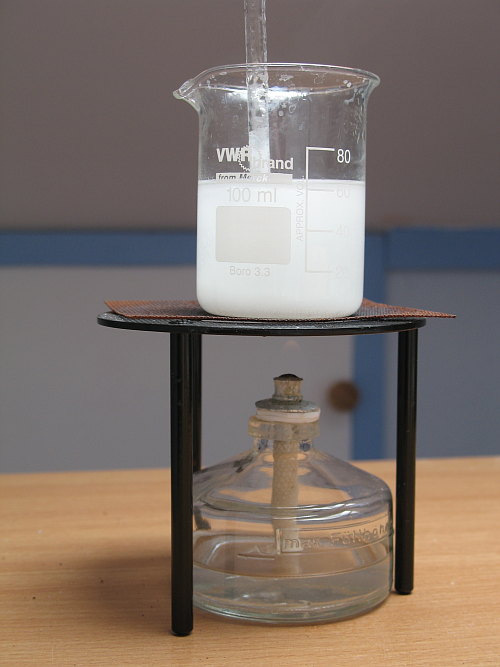
The beaker must be filled with a strongly alkaline solution of sodium iodide. For this purpose, 5 grams of sodium iodide and 15 grams of sodium hydroxide were taken (which is a 25% excess of sodium hydroxide) and put in a 100 ml beaker.
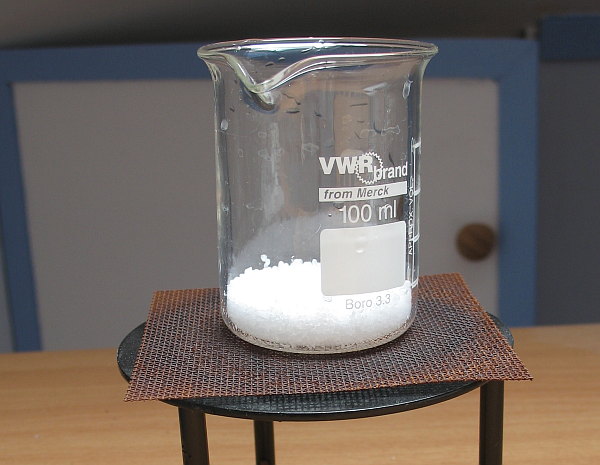
Approximately 50 ml of distilled water was added and the beaker was swirled in order to dissolve all of the solids. Be careful when doing this, a lot of heat is produced and the liquid becomes fairly hot. Finally, add water, such that approximately 80 ml of liquid is obtained and stir, such that a homogeneous solution is obtained.
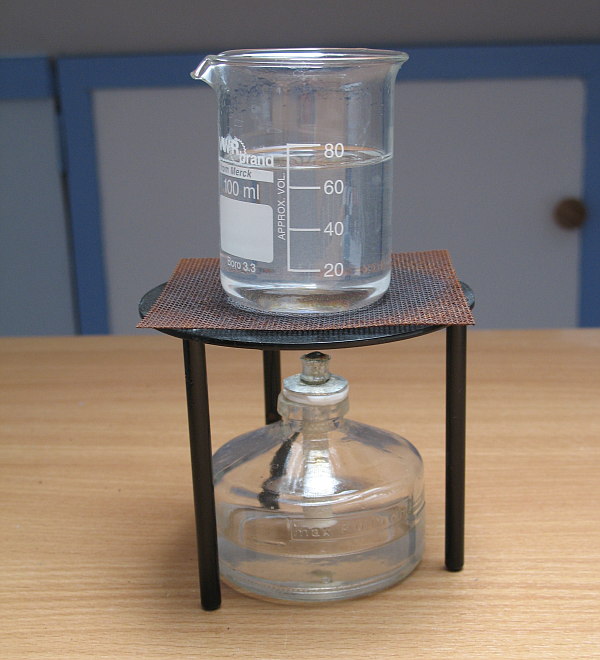
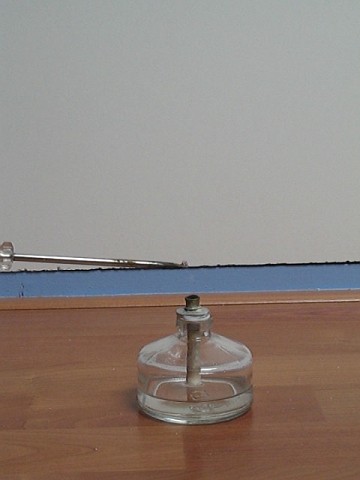
Put the beaker with the solution on a metal gauze and put the alcohol burner under the liquid and light the burner. In the mean time the chlorine generator and the tubing can be set up, while the liquid is heating up. The liquid must be near boiling when chlorine gas is bubbled through it, but the temperature is not critical, it just must be hot.
![]()
Experimental setup
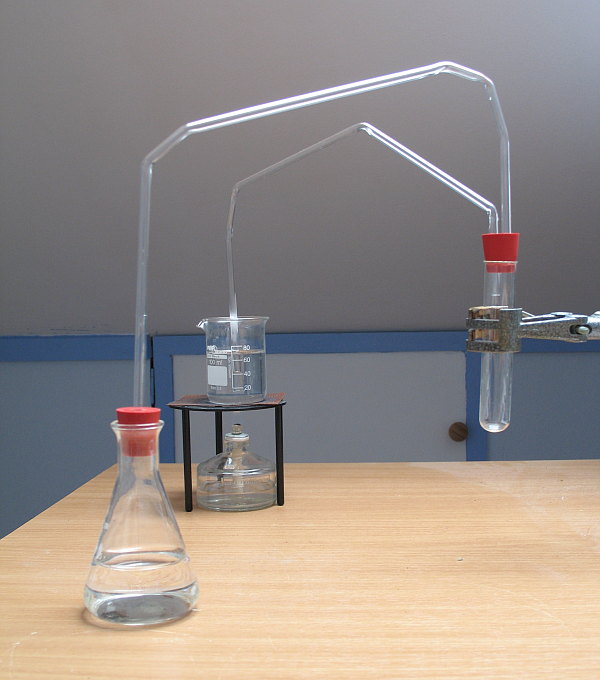
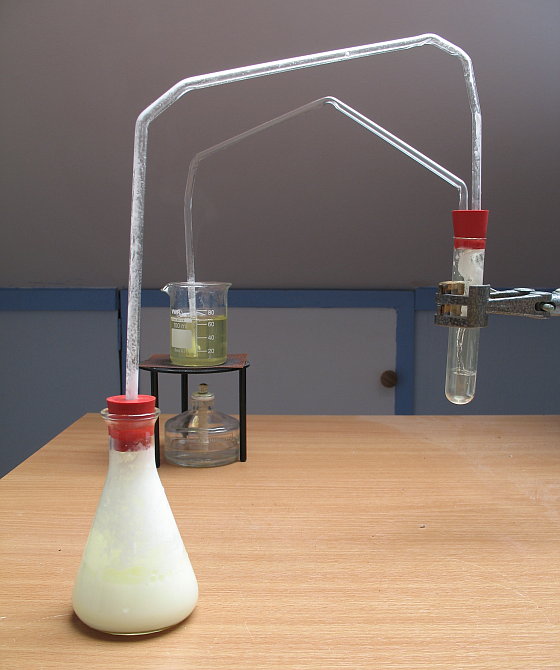
The apparatus needed for doing this experiment is not complicated, but one should take some time to carefully setup the entire apparatus. A schematic drawing of the apparatus is shown in the picture below.
At the left, an erlenmeyer is shown with dilute hydrochloric acid in which lumps of TCCA are put for making chlorine gas. The chlorine gas is going through a thin tube to a middle test tube and from that test tube, there is a second tube going to the bottom of the beaker, which is heated gently with a small flame.
It really is important to use the intermediate test tube. Generation of chlorine with TCCA leads to formation of quite some foam and especially if production of chlorine is going somewhat faster, then the foam may make it into the thin tube. If a single tube is used, then there is the risk of spoiling the contents of the beaker if foam from the chlorine generator makes it into the beaker. With an intermediate test tube, that test tube may become dirty, but no foam will get into the second thin tube. The actual setup is shown below (not yet in action).
![]()
The synthesis of the sodium orthoperiodate
When all has been setup, then the reaction can be started. The erlenmeyer must be filled with 10...15% hydrochloric acid, as shown in the picture above. The liquid in the beaker must be hot (nearly boiling). The stopper in the intermediate test tube must fit tightly. When all these things are done, then the reaction can be started.
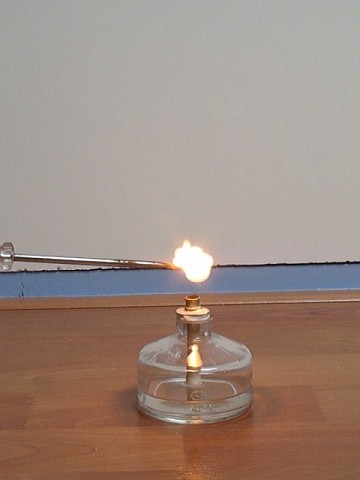
First, add a few small granules of TCCA (3 pea sized pieces are suitable) to the hydrochloric acid and immediately press the stopper into the erlenmeyer. This leads to a slow stream of chlorine gas and the air is driven out of the system. Slowly, bubbles of air bubble through the liquid. When all air is displaced by chlorine (the intermediate test tube is filled with the green gas), then some larger pieces of TCCA can be put in the erlenmeyer. When this is done, then a violent stream of gas is bubbling through the liquid in the beaker, but the bubbles dissolve in the liquid, they do not make it to the surface. This also is the reason, why initially, only slow gas generation is allowed. If from the start, a lot of gas is produced, then the flow of gas may be so violent that liquid bumps out of the beaker. When the gas is absorbed by the liquid, then it does not bump.
Just a few seconds after adding the first small granules of TCCA the situation is as follows:
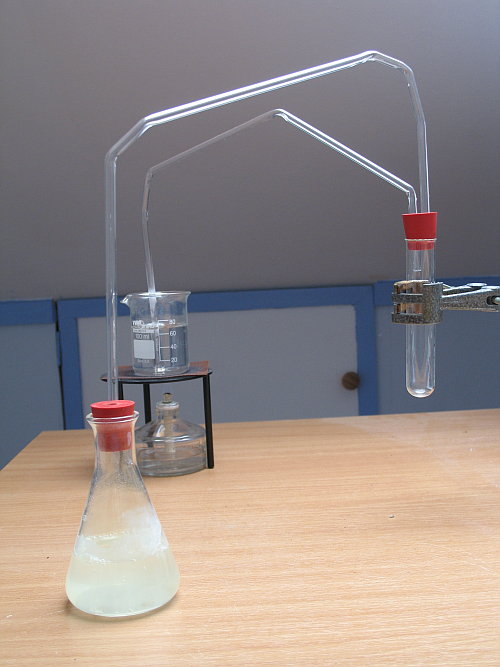
Gas bubbles pass through the liquid slowly and chlorine gas is produced in the erlenmeyer. After a while, the entire setup is filled with chlorine and then more and larger pieces of TCCA can be put in the erlenmeyer.
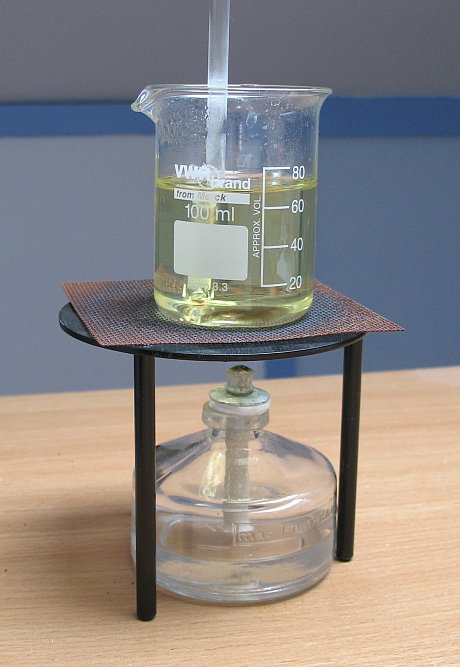
As soon as chlorine gas is passing through the liquid in the beaker, the liquid turns yellow/green. At a certain point in time, this color is quite intense and its intensity depends on the strength of the flow of chlorine through the liquid.
The picture below shows the chlorine generator, with quite some foam in it, the intermediate test tube is filled with the gas and the liquid is yellow/green and still clear.
Now, production of chlorine gas must go on for quite some time. Approximately 10 grams of chlorine must be passed through the liquid. In many countries, TCCA comes in 20 gram tablets. A good guideline is to take just over half of such a 20 gram TCCA tablet, and crush that in pea sized parts and throw these pieces in the erlenmeyer. The amount of chlorine is not that critical, it just must be somewere around 10 grams.
If another source of chlorine is used (e.g. calcium hypochlorite or Na-DCCA), then change the amount of solid, added to the hydrochloric acid, such that around 10 grams of gas are produced. When calcium hypochlorite is used, the take approximately 14 grams of solid. When Na-DCCA is used, then take approximately 15 grams of solid.
During the reaction, the acid in the chlorine generator needs to be replenished a few times, otherwise the production of chlorine goes too slow. When this is done, the apparatus needs to be opened and chlorine escapes into the air. Be careful when doing this, do not breathe the gas, it is extremely irritating! The turbid liquid with the used up TCCA can be flushed in the toilet, it is not more toxic than ordinary bleach. If you have a septic tank, then the TCCA-waste should not be flushed in the toilet, because the chlorine may damage bacterial life in the septic tank.
When production of chlorine goes too fast, then so much foam is produced that this makes it into the thin tube and the intermediate test tube. This is shown in the following picture.
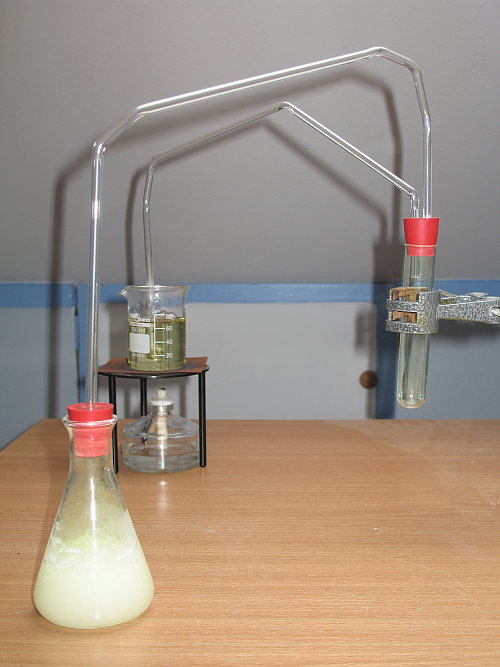
At a certain point, the yellow/green color of the liquid in the beaker disappears and the liquid becomes opaque. Before this happens, the liquid first becomes turbid while it still remains yellow/green, and then fairly suddenly, it becomes totally opaque and the yellow/green color disappears. A lot of very fine crystalline precipitate is formed.
When this happens, just keep on bubbling chlorine through the liquid, until all 10 grams of chlorine are bubbled through the liquid. A lot more of white precipitate will form during this reaction. It might be that the precipitate forms such a compact layer on the bottom of the beaker, that it starts bumping. If that is the case, then stop heating and keep on passing chlorine through the liquid for two more minutes or so and then stop.
It might be that too much water evaporates during the experiment. If this is the case, then add some boiling hot distilled water, such that the total volume is close to 80 ml again.
When all chlorine has passed through the liquid, then take away the flame. Finally, a thick layer of fine precipitate is obtained. The picture below shows the still quite hot liquid with the precipitate in it.
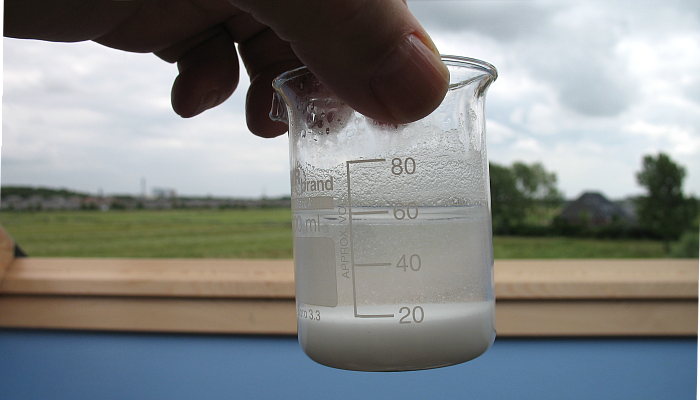
This white precipitate is almost 100% pure Na2H3IO6.
![]()
Isolation of the sodium orthoperiodate
The next step is the isolation of the sodium orthoperiodate. The material only dissolves in water very sparingly and it can be cleaned with cold water.
First decant as much as possible of the still hot liquid from the precipitate. Then add 50 ml of cold distilled water, stir well and let the precipitate settle again. Then again decant the water from the liquid as good as possible.
If you have a filter, then it is best to put the precipitate in a fine filter and rinse a few times with a small amount of cold distilled water. Then press out the final remains of water and then let the solid dry in a petri dish in a dry warm place.
If you don't have a filter, then repeat the rinse/decant procedure as explained above 2 more times, assuring that as much as possible of the water is decanted after each step. The removal of water can be improved by keeping a paper tissue in the wet precipitate and letting it draw water by means of capillary forces. If this is done, then one must assure that not a lot of precipitate is drawn into the paper tissue as well. After the last rinse, the liquid crystalline paste must be spread out in a petri dish and allowed to dry in a warm place.
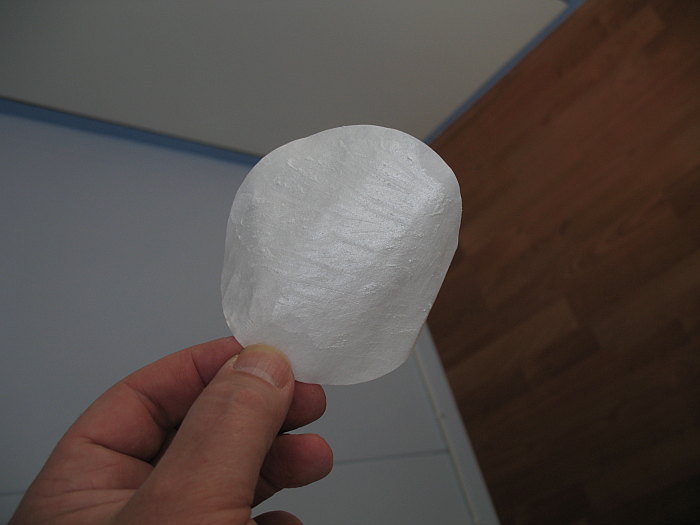
The final product is a snow-white nonhygroscopic perfectly dry white powder.
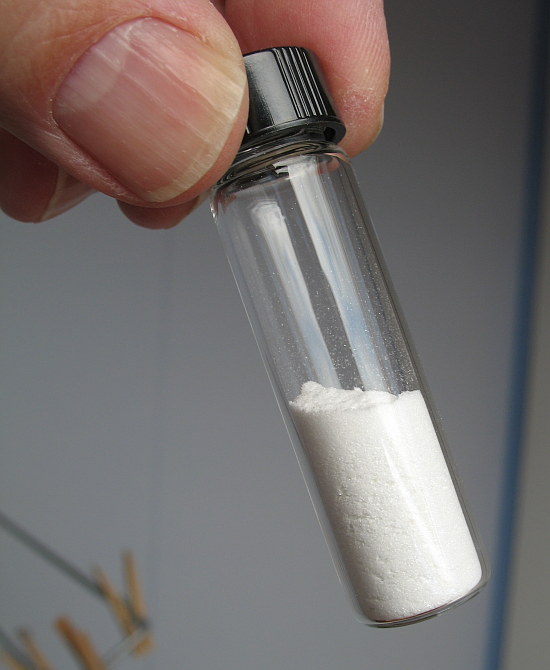
The yield was 3 grams. This is approximately ⅓ of theory.
A relatively large loss occurs in the final stage of work up. A lot of the solid remained in the filter, used for rinsing. This could not be scraped off, without damaging the filter. So, one point of improvement is to use a much smaller filter, such that less of the material sticks into the filter. Most likely more than 1 gram is lost in the filter.
When the workup of the material is done more carefully, then probably a yield of approximately 50% of theory can be obtained.
The liquid above the precipitate was discarded. Most likely another crop could be isolated from that as well, but one has to put much more effort in making that pure. Given the small amount of chemicals, used in this synthesis, it did not seem worth the effort to do that.
Remark: A better yield can also be obtained when more NaOH is used and more chlorine is bubbled through the solution (see discussion of results, at the end of the page).
![]()
Testing of the isolated material
Just to be sure that the material, isolated in this experiment, indeed is a pure periodate, some tests were performed:
- addition of the solid to dilute sulphuric acid
- addition of the solid to concentrated hydrochloric acid
- mixing of the solid with a reductor and igniting the mix
Test 1 tells something about the purity of the product. Even very small quantities of iodide or chloride can be detected easily. If any iodide or chloride is present, then that leads to a redox reaction in acidic media, with the production of iodine or iodine trichloride, which both have an intense color in aqueous solution. This test with dilute sulphuric acid shows no sign of reduction of some of the material at all. The solid quickly dissolves in the dilute acid and gives a colorless solution without odour.
Test 2 shows that indeed this is a strong oxidizer and a particular reaction, specific for iodates and periodates occurs. When the solid is added to the concentrated acid, then a lot of gas is produced (chlorine gas) and a deep yellow solution is obtained. This yellow color is due to formation of iodine trichloride.
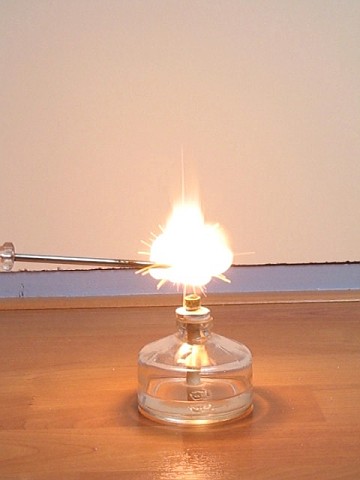
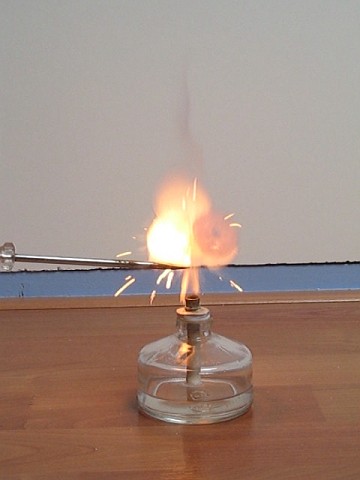
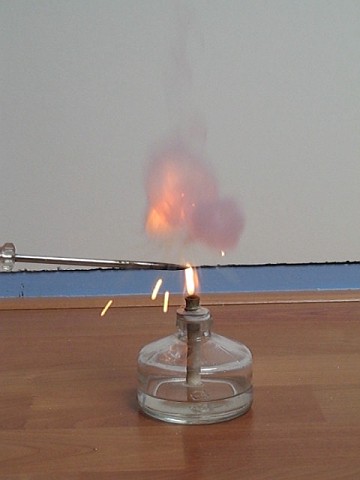
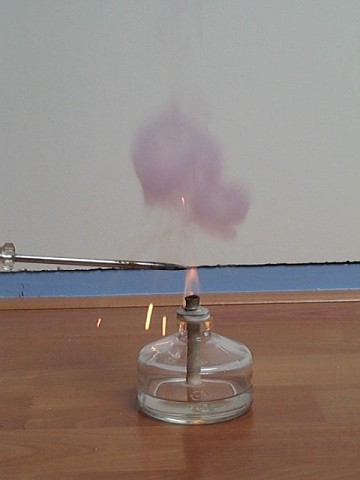
Test 3 shows that the solid indeed is a periodate and not iodate. Iodate only gives a tame reaction with red phosphorus and a mix with sulphur is hard to ignite. This test with red phosphorus shows an almost flash like burning rate with red phosphorus and a fast buring rate with sulphur. The six picture below show the result of burning a mix of the periodate and red phosphorus (the mix contained too much phosphorus). There is 33 ms between the frames in the series below.
![]()
The underlying principle of this synthesis
The net reaction for this synthesis is the following:
Iñ + 9OHñ + 4Cl2 → H3IO62ñ + 8Clñ + 3H2O
The iodide is oxidized to orthoperiodate by the chlorine. Most likely there will be side reactions in which iodate is formed as well and probably some of the chlorine also may lead to formation of chlorate and chloride. When the temperature is high (near boiling), then these side reactions are minimal and the main reaction is oxidation of iodide to periodate.
The net reaction does not occur in a single step, but is goes in different stages. First there is formation of the yellow/green material which remains in solution and more slowly is converted to periodate.
The sodium salt of the H3IO62ñ-ion is very sparingly soluble and precipitates in the reaction.
In reality, the solution contains many different species. Orthoperiodate is not a single entity in solution, but occurs in different stages of protonation. In solution there will be species like H3IO62ñ, H2IO63ñ, and H4IO6ñ. The sodium salt of H3IO62ñ precipitates from solution. When the solution becomes very strongly alkaline, then the salt dissolves again and when the solution is acidified, then the salt also dissolves.
Remark: When potassium iodide is used instead of sodium iodide, then certainly there will also be a reasonable yield, but getting a pure product may be much harder. Potassium ions lead to formation of a precipitate at a different pH range, where there is more of the H4IO6ñ ion in solution (then KIO4 precipitates from solution). But as there is an equilibrium between all the different species and precipitation takes away one of the components of the equilibrium, this may lead to considerable contamination of the product. It is expected that with potassium iodide and sodium hydroxide the final product will be a mix of KIO4 and Na2H3IO6. The product can be made free of chlorides and iodides, so in the sense of periodate purity it can be regarded as being pure, but the mix of sodium ions and potassium ions may be disturbing in some situations.
Remark2: A better yield can be obtained by using a larger excess of NaOH and bubbling much more chlorine through the solution. There is an unwanted side reaction in which chlorine and hydroxide react to give chloride and chlorate. Better results can be obtained by taking 25 grams of NaOH instead of 15 grams. Keep the volume of the solution between 125 ml and 150 ml and then bubble two to three times as much chlorine through the boiling hot liquid as was done in the experiment described above. When the precipitate does not become thicker (or when 30 grams of chlorine have been bubbled through) then one can stop adding more chlorine.
![]()
Another related experiment is the following: Synthesis of KIO4. The nice thing of the experiment on this page is that only chemicals are needed, which are easy to obtain. The synthesis of KIO4 mentioned in the other page requires potassium iodate, which is harder to obtain than iodides. I expect that the other experiment easily can be adapted so that KI is needed instead of KIO3. Add more potassium hydroxide and bubble more chlorine through the solution. An estimated first start is 5 grams of KI, 20 grams of chlorine bubbled through the solution and 25 grams of KOH. Again, after treatment with chlorine, the solution must be acidified in order to precipitate KIO4.